Soft & Fluffy Homemade Pita Bread
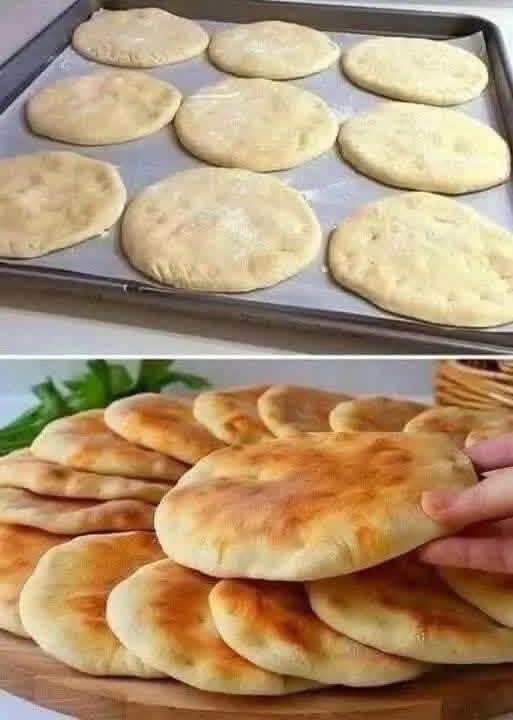
Soft & Fluffy Homemade Pita BreadThere’s something magical about pulling warm, freshly baked pita bread from the oven. Soft, pillowy, and slightly chewy, homemade pita bread is far better than anything from the store. Each round puffs beautifully in the oven, creating that signature pocket perfect for stuffing with grilled meats, falafel, fresh vegetables, or creamy spreads. Even better, this recipe uses simple pantry ingredients and requires no special equipment.Whether you’re serving pita alongside soups and salads, turning it into sandwiches, or enjoying it warm with olive oil and herbs, this homemade version delivers incredible flavor and texture every single time. The dough is easy to work with, the ingredients are affordable, and the aroma that fills your kitchen while the bread bakes is unforgettable.Why You’ll Love This RecipeThis pita bread recipe creates soft, fluffy rounds with a light texture and beautiful puff. The dough is simple enough for beginners yet reliable enough for experienced bakers. Unlike many store-bought versions that can feel dry or stiff, homemade pita stays tender and flavorful.The recipe is also versatile. You can make classic pockets for sandwiches or roll the dough slightly thicker for soft flatbreads. They freeze wonderfully, making them ideal for meal prep.IngredientsMakes 8–10 pitas3 cups all-purpose flour, plus extra for dusting1 tablespoon sugar2 1/4 teaspoons active dry yeast (1 packet)1 1/4 teaspoons salt1 cup warm water (about 110°F / 43°C)2 tablespoons olive oil, plus extra for greasing the bowlIngredient NotesFlourAll-purpose flour gives the pita bread a soft texture while still allowing enough structure for the bread to puff. If you prefer a heartier flavor, you can substitute up to 1 cup of whole wheat flour.YeastActive dry yeast helps the dough rise and creates the airy interior. Make sure your yeast is fresh and not expired. If the yeast doesn’t foam during activation, it may be inactive.Warm WaterThe water should feel warm but not hot. Water that’s too hot can kill the yeast, while water that’s too cool may slow the rising process.Olive OilOlive oil adds moisture and tenderness to the dough while enhancing flavor.Step-by-Step InstructionsStep 1: Activate the YeastIn a large mixing bowl, combine the warm water, sugar, and active dry yeast. Stir gently and let the mixture sit for about 5–10 minutes.During this time, the yeast should become foamy and bubbly. This means the yeast is active and ready to use. If no foam appears, start over with fresh yeast.Step 2: Mix the DoughAdd the olive oil and salt to the yeast mixture. Gradually add the flour, one cup at a time, stirring until a shaggy dough forms.Once the dough becomes difficult to stir, transfer it to a lightly floured surface.Step 3: Knead the DoughKnead the dough for about 8–10 minutes until it becomes smooth, soft, and elastic.If the dough feels too sticky, sprinkle in a little extra flour, one tablespoon at a time. Avoid adding too much flour, as this can make the pita dense instead of fluffy.The dough should feel soft and slightly tacky but not wet.Step 4: First RiseLightly oil a clean bowl with olive oil. Place the dough inside and turn it once so the surface is coated lightly in oil.Cover the bowl with a clean kitchen towel or plastic wrap. Let the dough rise in a warm place for about 1–1 1/2 hours, or until doubled in size.A warm kitchen helps the dough rise more efficiently. If your kitchen is cool, place the bowl in a slightly warm oven with the oven turned off.Step 5: Divide the DoughOnce the dough has doubled, gently punch it down to release excess air.Transfer the dough to a lightly floured surface and divide it into 8–10 equal pieces, depending on the size you want your pitas.Shape each piece into a smooth ball. Cover the dough balls with a towel and let them rest for 15–20 minutes. This resting period relaxes the gluten and makes rolling easier.Step 6: Roll the PitasUsing a rolling pin, roll each dough ball into a circle about 1/4 inch thick.Try to keep the thickness even so the pitas puff properly in the oven. Uneven rolling can cause partial puffing.Keep the rolled dough covered lightly with a towel while working to prevent drying out.Step 7: Preheat the OvenPlace a baking stone, pizza stone, or upside-down baking sheet in the oven and preheat to 475°F (245°C).A very hot oven is essential for getting the pita bread to puff quickly.Allow the oven and baking surface to heat for at least 20 minutes before baking.Step 8: Bake the Pita BreadCarefully place 2–3 pita rounds onto the hot baking surface.Bake for 2–3 minutes until the pitas puff dramatically. Flip and bake for 1 more minute if desired.The bread should remain soft with only light golden spots. Avoid overbaking, as this can make the pita crisp instead of fluffy.Remove the baked pitas and immediately wrap them in a clean kitchen towel. This traps steam and keeps them soft.Continue baking the remaining dough rounds.Tips for Perfect Pita BreadUse High HeatThe sudden burst of heat creates steam inside the dough, which forms the signature pocket.Don’t OverflourToo much flour can make the dough dry and prevent proper puffing.Keep Dough CoveredExposed dough dries out quickly, which can affect texture.Roll EvenlyUniform thickness helps the bread puff evenly in the oven.Store Warm Pitas in a TowelWrapping the bread keeps it tender and prevents it from drying out.Serving IdeasHomemade pita bread is incredibly versatile. Here are a few delicious ways to enjoy it:Stuff with grilled chicken, lettuce, tomatoes, and garlic sauceServe alongside hummus or tzatzikiUse for gyros or shawarma wrapsCut into wedges and toast into pita chipsPair with soups, curries, or saladsFill with falafel and fresh vegetablesSpread with butter and herbs for a simple snackStorage InstructionsRoom TemperatureStore pita bread in an airtight container or zip-top bag for up to 3 days.RefrigeratorRefrigerate for up to 1 week, though refrigeration may slightly dry the bread.FreezerFreeze cooled pitas in a freezer-safe bag for up to 3 months. Place parchment paper between each pita to prevent sticking.To reheat, warm in a skillet, microwave, or oven until soft.Common QuestionsWhy Didn’t My Pita Puff?Usually this happens if:The oven wasn’t hot enoughThe dough was rolled unevenlyThe dough dried out before bakingThe yeast was inactiveCan I Make the Dough Ahead?Yes. After the first rise, refrigerate the dough overnight. Bring it to room temperature before shaping and baking.Can I Cook Pita on the Stove?Absolutely. Heat a cast-iron skillet over medium-high heat and cook each pita for about 1–2 minutes per side until puffed and lightly browned.Final ThoughtsMaking homemade pita bread from scratch is easier than many people expect, and the results are incredibly rewarding. Fresh pita is soft, warm, flavorful, and wonderfully fluffy with that classic pocket inside. Once you try homemade, it’s hard to go back to store-bought versions.This recipe is simple enough for everyday baking yet impressive enough for sharing with family and friends. Serve the pitas warm from the oven with your favorite dips, fillings, or meals, and enjoy the comforting taste of freshly baked bread right at home.