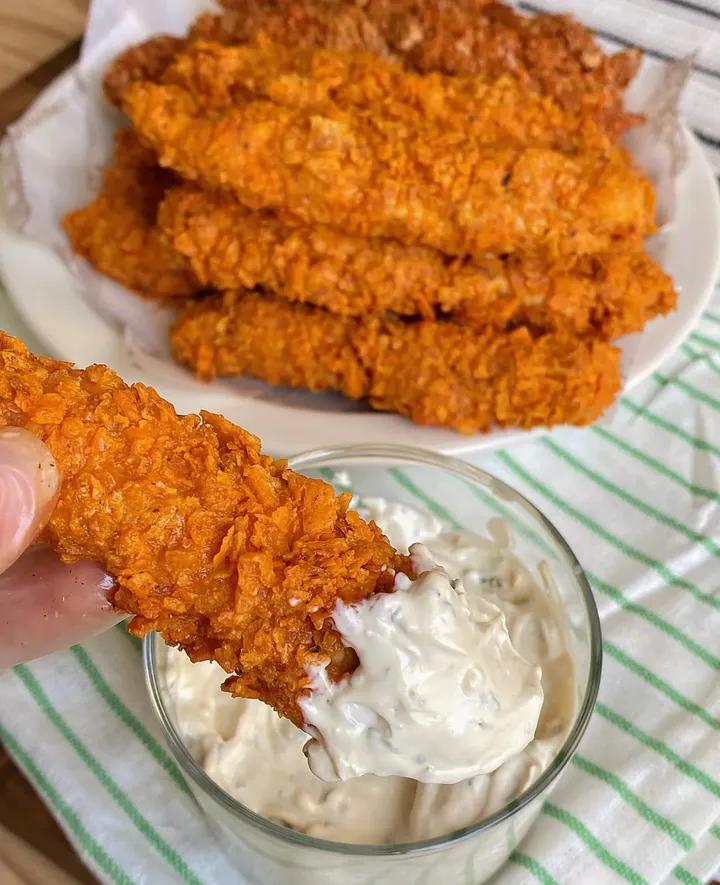
Crispy Chicken Strips with Creamy Dip 🐔✨There’s something incredibly comforting about a basket of crispy chicken strips fresh from the fryer. Golden, crunchy, juicy on the inside, and served with a creamy dipping sauce that makes every bite even better — this is the kind of meal that disappears fast from the table. Whether you’re cooking for family dinner, movie night, game day, or simply craving crunchy comfort food, these homemade chicken strips are guaranteed to satisfy.What makes this recipe special is how simple the ingredients are. No complicated techniques, no hard-to-find items, and no fancy equipment required. The coating becomes extra crispy thanks to crushed cornflakes, while the seasoning blend gives the chicken deep savory flavor with hints of garlic, onion, and smoky paprika. The creamy dip balances everything perfectly with a cool, tangy finish.These chicken strips are better than takeout, incredibly customizable, and surprisingly easy to make at home.
Why You’ll Love This Recipe ❤️These crispy chicken strips are:Crunchy on the outsideTender and juicy insidePacked with flavorEasy to preparePerfect for kids and adultsGreat for parties or snacksDelicious with fries, salad, or sandwichesThe cornflake coating gives the chicken a beautiful textured crunch that stays crispy even after cooling slightly. Unlike many fast-food versions, homemade strips let you control the seasoning, freshness, and quality of ingredients.
Ingredients 🧺For the Chicken Strips500g chicken breast, cut into strips1 cup flour2 eggs2 cups crushed cornflakes (or breadcrumbs)1 tsp paprika1 tsp garlic powder1 tsp onion powderSalt, to tasteBlack pepper, to tasteOil for frying
Optional Creamy Dip 🥣To make a quick creamy dipping sauce, combine:½ cup mayonnaise2 tbsp ketchup1 tsp garlic powder1 tsp lemon juicePinch of paprikaSalt and black pepperMix until smooth and refrigerate until ready to serve.
Step 1: Prepare the Chicken 🔪Start by washing and patting dry the chicken breasts. Dry chicken helps the coating stick better and creates a crispier finish.Slice the chicken into even strips. Try to keep them similar in size so they cook evenly. Thin strips cook quickly and stay tender, while thicker strips may need slightly longer frying time.Season the chicken lightly with salt and black pepper. This first layer of seasoning helps flavor the meat itself instead of relying only on the coating.Let the chicken rest for about 10 minutes while preparing the coating stations.
Step 2: Prepare the Crispy Coating 🌽In one shallow bowl, add the flour. Mix in half the paprika, garlic powder, onion powder, salt, and pepper.In a second bowl, crack the eggs and whisk until smooth.In a third bowl, add crushed cornflakes. Mix in the remaining paprika, garlic powder, onion powder, salt, and pepper.The cornflakes are what make these chicken strips extra crispy. Crush them lightly using your hands or place them in a zip bag and gently crush with a rolling pin. You want small crunchy pieces — not fine powder.If using breadcrumbs instead of cornflakes, panko breadcrumbs work especially well for added crunch.
Step 3: Coat the Chicken ✨Take one chicken strip and coat it in the seasoned flour first. Shake off any excess flour.Next, dip it into the beaten eggs, making sure every part is covered.Finally, press the chicken into the crushed cornflakes until fully coated. Press gently so the coating sticks properly.Place the coated strips on a tray or plate and repeat with the remaining chicken.For extra crispy chicken strips, let the coated chicken rest for 10–15 minutes before frying. This helps the coating adhere better and prevents it from falling off during cooking.
Step 4: Heat the Oil 🔥Pour oil into a deep frying pan or pot until it reaches about 2 inches deep.Heat the oil over medium heat. The ideal temperature is around 175°C (350°F). If the oil is too hot, the outside burns before the inside cooks. If it’s too cool, the chicken absorbs excess oil and becomes greasy.To test the oil without a thermometer, drop in a small piece of coating. If it sizzles immediately and rises slowly to the surface, the oil is ready.
Step 5: Fry the Chicken 🍗Carefully place a few chicken strips into the hot oil. Do not overcrowd the pan, or the temperature will drop and the chicken won’t crisp properly.Fry for about 4–5 minutes per side, depending on thickness, until golden brown and fully cooked.The outside should become deeply golden and crunchy while the inside stays juicy and tender.Transfer the cooked chicken to a plate lined with paper towels to drain excess oil.Repeat until all chicken strips are cooked.
Step 6: Make the Creamy Dip 🥣While the chicken cools slightly, prepare the dipping sauce.In a small bowl, combine mayonnaise, ketchup, garlic powder, lemon juice, paprika, salt, and black pepper.Mix until smooth and creamy.You can adjust the flavor however you like:Add hot sauce for spice 🌶️Add honey for sweetness 🍯Add herbs for freshness 🌿Chill the dip for a few minutes before serving for the best flavor.
Serving Suggestions 🍟These crispy chicken strips are incredibly versatile and can be served in many ways:Classic StyleServe with fries and creamy dip for the ultimate comfort meal.Healthy OptionPair with a fresh salad or roasted vegetables.Wraps & SandwichesStuff the chicken strips into wraps or burger buns with lettuce, tomatoes, and extra sauce.Party SnackServe on a platter with different dips like ranch, honey mustard, spicy mayo, or barbecue sauce.
Tips for Perfect Chicken Strips ⭐1. Use Cornflakes for Maximum CrunchCornflakes create a lighter, crispier coating than regular breadcrumbs.2. Don’t Skip SeasoningSeason every layer — the chicken, flour, and coating — for the best flavor.3. Rest Before FryingLetting the coated chicken sit briefly helps the crust stick better.4. Maintain Oil TemperatureConsistent heat creates crispy chicken without greasiness.5. Fry in BatchesCrowding the pan lowers the oil temperature and causes soggy coating.
Air Fryer Option 🌬️If you prefer a lighter version, these chicken strips also work beautifully in the air fryer.Preheat air fryer to 200°C (400°F)Spray chicken lightly with oilCook for 10–12 minutesFlip halfway through cookingThe result is crispy, golden chicken with much less oil.
Storage & Reheating 🥡RefrigeratorStore leftovers in an airtight container for up to 3 days.FreezerFreeze uncooked coated chicken strips on a tray first, then transfer to a freezer bag. Fry directly from frozen when needed.ReheatingFor best crispiness, reheat in an oven or air fryer instead of the microwave.
Final Thoughts ❤️Homemade crispy chicken strips are one of those recipes everyone should know how to make. They’re simple, affordable, and always a crowd favorite. The crunchy cornflake coating gives every bite irresistible texture, while the seasoned chicken stays juicy and flavorful inside.Paired with the creamy homemade dip, these chicken strips become the kind of meal people request again and again. Once you try them fresh and homemade, it’s hard to go back to frozen or fast-food versions.Serve them hot, crunchy, and fresh from the fryer — and don’t forget extra dip on the side. 🍗
Crispy Chicken Strips with Creamy Dip