Hot Chocolate Lava Cake (Melty, Rich & Irresistible!)
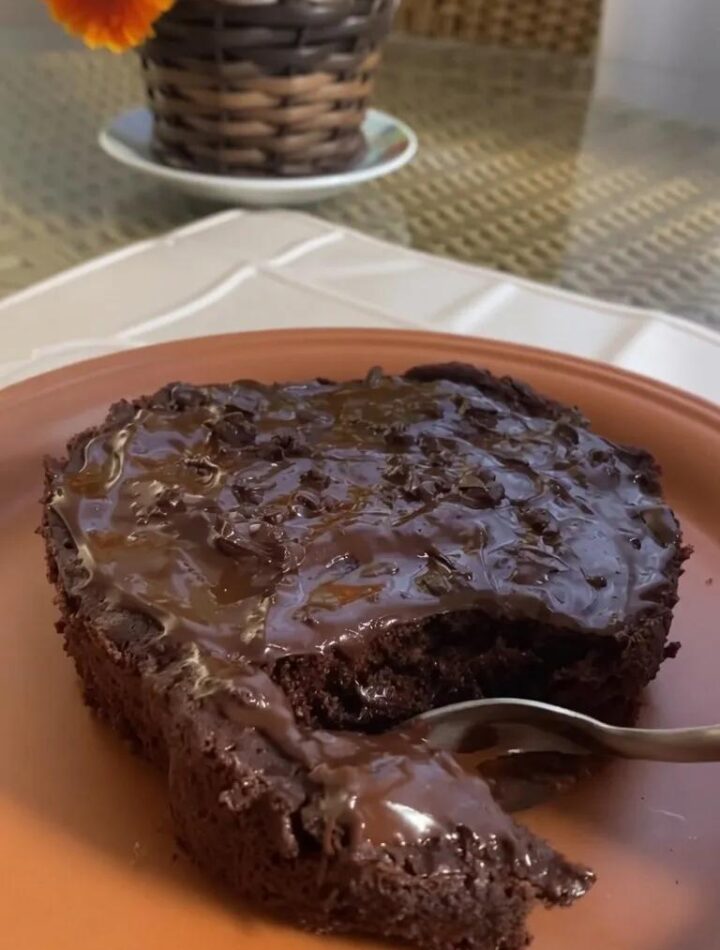
Hot Chocolate Lava Cake (Melty, Rich & Irresistible!)There’s something magical about cutting into a warm chocolate lava cake and watching the rich, silky chocolate center slowly flow onto the plate. It feels fancy enough for a restaurant dessert, yet it’s surprisingly simple to make at home with everyday ingredients. This Hot Chocolate Lava Cake recipe delivers everything you want in a chocolate dessert: a soft cake exterior, a gooey molten center, deep cocoa flavor, and a warm aroma that fills the kitchen from the moment it starts baking.Whether you’re preparing dessert for a cozy family dinner, a romantic date night, a birthday celebration, or simply satisfying a late-night chocolate craving, this recipe never disappoints. The best part is that you don’t need complicated baking skills or expensive ingredients. With just a few pantry staples and a little attention to baking time, you can create an indulgent dessert that looks and tastes incredible.Why You’ll Love This RecipeThis lava cake is rich without being overly heavy, sweet without becoming overpowering, and incredibly moist thanks to the melted butter and milk in the batter. The cocoa powder gives it an intense chocolate flavor, while the vanilla extract adds warmth and depth. The secret to the molten center is slightly underbaking the cakes so the middle stays soft and creamy.Another reason this dessert is so popular is how versatile it is. You can serve it with vanilla ice cream, whipped cream, strawberries, caramel sauce, powdered sugar, or even a drizzle of melted chocolate. Every bite feels luxurious and comforting at the same time.IngredientsFor the Lava Cake Batter2 eggs 🥚1/2 cup sugar1/3 cup melted butter 🧈1/2 cup milk 🥛1 cup all-purpose flour 🌾1/3 cup cocoa powder 🍫1 tsp baking powder1 tsp vanilla extractOptional Add-InsChocolate chunks or chocolate chips for extra molten fillingA pinch of espresso powder to intensify the chocolate flavorChopped nuts for textureOptional ToppingsVanilla ice cream 🍨Powdered sugarFresh berries 🍓Chocolate syrupWhipped creamKitchen Tools You’ll NeedMixing bowlsWhisk or electric mixerMeasuring cups and spoonsRubber spatulaRamekins or muffin tinsNonstick spray or butter for greasingStep 1: Prepare the Baking DishesStart by preheating your oven to 375°F (190°C). Proper oven temperature is important because lava cakes rely on precise baking time to achieve the gooey center.Grease your ramekins or muffin tin generously with butter or nonstick spray. This step ensures the cakes release easily after baking. If you want an extra layer of protection, lightly dust the greased dishes with cocoa powder instead of flour. Cocoa powder prevents white streaks from appearing on the finished cakes and adds even more chocolate flavor.Place the prepared ramekins on a baking tray for easier handling.Step 2: Mix the Wet IngredientsIn a large mixing bowl, crack the eggs and add the sugar. Whisk the mixture until it becomes pale and slightly frothy. This process helps create a lighter texture in the finished cakes.Slowly pour in the melted butter while whisking continuously. The butter adds richness and moisture, giving the lava cakes their tender crumb.Next, add the milk and vanilla extract. Stir until everything is smooth and fully combined. The batter should look glossy and creamy at this stage.Step 3: Combine the Dry IngredientsIn a separate bowl, sift together the flour, cocoa powder, and baking powder. Sifting is important because cocoa powder tends to form lumps, and you want the batter to be silky smooth.Gradually fold the dry ingredients into the wet ingredients using a spatula or whisk. Mix only until combined. Overmixing can make the cakes dense instead of soft and tender.If you want an extra molten center, now is the perfect time to fold in a few chocolate chunks or chocolate chips.Step 4: Fill the RamekinsDivide the batter evenly among the prepared ramekins, filling each about three-quarters full. This gives the cakes enough room to rise without overflowing.For an even richer lava center, place a square of chocolate or a spoonful of chocolate spread in the middle of each ramekin before covering it with a little extra batter.Step 5: Bake to PerfectionBake the lava cakes for about 10–14 minutes, depending on the size of your ramekins and your oven. The edges should look set, but the center should still appear slightly soft and underdone.This is the most important step. Overbaking will turn the molten center into regular cake, while underbaking too much may leave the cakes too runny. The perfect lava cake has a delicate outer shell and a warm, flowing center.You’ll know they’re ready when the tops are puffed and the edges pull slightly away from the sides.Step 6: Let Them Rest BrieflyRemove the cakes from the oven and let them sit for 1–2 minutes. This short resting time helps them firm up enough to unmold while still keeping the center molten.Carefully run a knife around the edges if needed, then invert each cake onto a serving plate.Serving SuggestionsHot Chocolate Lava Cake is best enjoyed immediately while still warm. Once you cut into the center, the chocolate filling should slowly spill out like melted chocolate sauce.Here are a few delicious serving ideas:Add a scoop of vanilla ice cream for the perfect hot-and-cold contrastDust with powdered sugar for a bakery-style finishTop with strawberries or raspberries for freshnessDrizzle with caramel or chocolate sauce for extra indulgenceServe with whipped cream and chocolate shavingsTips for Success1. Don’t OverbakeThe gooey center depends entirely on timing. Start checking the cakes early because every oven is slightly different.2. Use Good Cocoa PowderSince cocoa powder is the main flavor ingredient, quality matters. A rich cocoa powder creates a deeper, more luxurious chocolate taste.3. Grease the Ramekins WellProperly greased ramekins make unmolding much easier and help preserve the cake’s beautiful shape.4. Serve ImmediatelyLava cakes lose their molten texture as they cool, so serve them fresh from the oven for the best experience.5. Add Extra ChocolateIf you love ultra-gooey desserts, adding chocolate chunks to the center guarantees a rich molten filling every time.Fun VariationsPeanut Butter Lava CakeAdd a spoonful of peanut butter in the center before baking.Mocha Lava CakeMix in a teaspoon of espresso powder for a coffee-chocolate flavor combination.Salted Caramel Lava CakePlace a caramel candy or caramel sauce in the middle for a sweet-salty surprise.White Chocolate Raspberry Lava CakeAdd white chocolate chunks and a few raspberries to the batter.Storing and ReheatingAlthough lava cakes are best fresh, leftovers can still be delicious.Store cooled cakes in an airtight container in the refrigerator for up to 3 days. Reheat in the microwave for about 20–30 seconds before serving. The center may not be as molten as freshly baked cakes, but the flavor will still be rich and satisfying.You can also freeze unbaked batter in ramekins. When ready to bake, place them directly into the oven and add an extra minute or two to the baking time.Final ThoughtsHot Chocolate Lava Cake is one of those desserts that never goes out of style. It’s warm, comforting, deeply chocolatey, and impressive enough for special occasions while still being easy enough for a weekday treat. Every spoonful combines fluffy cake with flowing chocolate, creating a dessert experience that feels luxurious and unforgettable.Once you master the timing, you’ll want to make these lava cakes again and again. They’re quick, customizable, and guaranteed to satisfy every chocolate lover at the table. Serve them warm, grab a spoon, and enjoy every rich, melty bite.