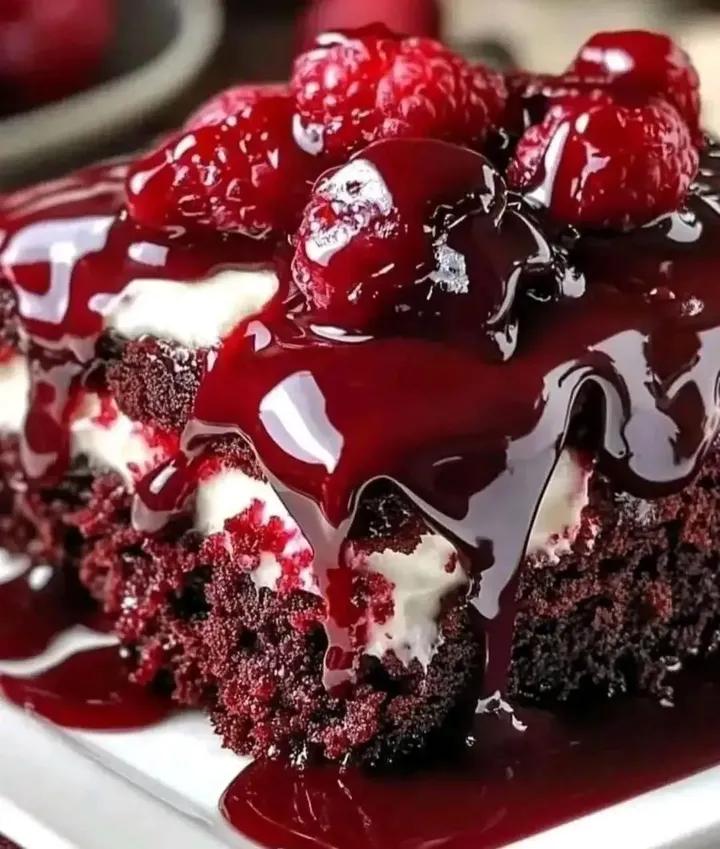
This Red Velvet Brownie Cheesecake with Raspberry Glaze is a truly unforgettable dessert that combines three incredible treats into one spectacular centerpiece. Rich, fudgy red velvet brownie layers provide the perfect foundation for a silky cheesecake filling, while a vibrant raspberry glaze adds a sweet-tart finish that balances every bite. The striking red, white, and ruby-red layers make this dessert as beautiful as it is delicious.
Perfect for holidays, Valentine’s Day, birthdays, dinner parties, or any celebration, this decadent dessert is guaranteed to impress your guests. While it looks bakery-worthy, the recipe is surprisingly manageable when broken down into simple steps.
Ingredients
For the Red Velvet Brownie Layers (Makes 2 Layers)
1 cup (2 sticks) unsalted butter, melted 🧈
2 cups granulated sugar
4 large eggs 🥚
2 teaspoons vanilla extract
2 tablespoons red food coloring ❤️
1/4 cup unsweetened cocoa powder 🍫
1 1/2 cups all-purpose flour
1/2 teaspoon salt
1 teaspoon white vinegar
For the Cheesecake Filling
24 ounces cream cheese, softened 🧀
3/4 cup granulated sugar
3 large eggs
1 teaspoon vanilla extract
1/2 cup sour cream
2 tablespoons all-purpose flour
For the Raspberry Glaze
2 cups fresh or frozen raspberries 🍓
1/3 cup granulated sugar
2 tablespoons lemon juice 🍋
1 tablespoon cornstarch
2 tablespoons water
Optional Garnishes
Fresh raspberries
White chocolate curls
Whipped cream
Mint leaves
Instructions
Step 1: Prepare the Oven and Pans
Preheat your oven to 350°F (175°C). Grease two 9-inch round cake pans and line the bottoms with parchment paper. Lightly grease the parchment paper as well to ensure easy removal.
Having your pans prepared before mixing the batter helps everything come together smoothly.
Step 2: Make the Red Velvet Brownie Batter
In a large mixing bowl, whisk together the melted butter and granulated sugar until fully combined. The mixture should appear glossy and smooth.
Add the eggs one at a time, whisking well after each addition. Stir in the vanilla extract and red food coloring until the batter becomes a vibrant red color.
Sift the cocoa powder, flour, and salt into the wet ingredients. Gently fold everything together until just combined. Avoid overmixing, as this can make the brownies less fudgy.
Finally, stir in the vinegar. The vinegar helps enhance the classic red velvet flavor and contributes to the tender texture.
Step 3: Bake the Brownie Layers
Divide the brownie batter evenly between the prepared cake pans.
Bake for 20–25 minutes or until a toothpick inserted near the center comes out with a few moist crumbs attached.
The brownies should be set but still slightly soft in the center. Overbaking can result in dry layers.
Remove from the oven and allow the brownie layers to cool completely in their pans before removing them.
Step 4: Prepare the Cheesecake Filling
Reduce the oven temperature to 325°F (163°C).
In a large mixing bowl, beat the softened cream cheese until smooth and creamy. This step is important for preventing lumps in the finished cheesecake.
Gradually add the sugar and continue mixing until light and fluffy.
Add the eggs one at a time, mixing on low speed after each addition. Stir in the vanilla extract and sour cream.
Finally, mix in the flour until just incorporated. Avoid overbeating the batter, as too much air can cause cracking during baking.
The filling should be silky smooth and luxurious.
Step 5: Assemble the Cheesecake
Place one cooled brownie layer into the bottom of a springform pan.
Pour the cheesecake filling evenly over the brownie layer, smoothing the top with a spatula.
Carefully place the second brownie layer on top of the cheesecake filling. Press gently to secure it without forcing it into the batter.
Wrap the outside of the springform pan with aluminum foil if using a water bath.
Step 6: Bake the Cheesecake
Place the assembled cheesecake into a larger roasting pan. Fill the roasting pan with about one inch of hot water.
The water bath helps create gentle, even heat and reduces the chance of cracks forming.
Bake for 60–75 minutes, or until the edges are set but the center still has a slight jiggle.
Turn off the oven and crack the door open slightly. Allow the cheesecake to cool inside the oven for about 1 hour.
This gradual cooling process helps prevent sudden temperature changes that can cause cracks.
Step 7: Chill Thoroughly
Remove the cheesecake from the oven and allow it to cool completely at room temperature.
Cover and refrigerate for at least 6 hours, preferably overnight.
Chilling allows the cheesecake to fully set and develop its rich flavor and creamy texture.
Step 8: Make the Raspberry Glaze
While the cheesecake chills, prepare the raspberry glaze.
Combine the raspberries, sugar, and lemon juice in a small saucepan over medium heat.
Cook for 5–7 minutes, stirring occasionally, until the berries begin breaking down and releasing their juices.
In a small bowl, whisk together the cornstarch and water to create a slurry.
Stir the slurry into the raspberry mixture and continue cooking for another 2–3 minutes until thickened and glossy.
For an extra smooth glaze, strain the mixture through a fine-mesh sieve to remove the seeds.
Allow the glaze to cool completely before using.
Step 9: Glaze the Cheesecake
Remove the chilled cheesecake from the refrigerator.
Pour the cooled raspberry glaze over the top of the cheesecake and gently spread it to the edges using an offset spatula.
The glossy red topping creates a stunning finish and adds a bright burst of berry flavor.
Step 10: Garnish and Serve
Decorate the cheesecake with fresh raspberries, white chocolate curls, whipped cream, or mint leaves if desired.
Slice with a sharp knife dipped in hot water and wiped clean between cuts for bakery-quality slices.
Serve chilled and enjoy every decadent bite.
Tips for Success
Use room-temperature cream cheese for the smoothest filling.
Do not overmix the cheesecake batter.
Bake using a water bath for the creamiest texture.
Chill overnight for the best flavor and clean slices.
Straining the raspberry glaze creates a professional-looking finish.
Use gel food coloring for a deeper red velvet color if preferred.
Storage
Store the cheesecake covered in the refrigerator for up to 5 days. The flavors become even more delicious after a day of chilling.
For longer storage, freeze individual slices tightly wrapped for up to 2 months. Thaw overnight in the refrigerator before serving.
Final Thoughts
Red Velvet Brownie Cheesecake with Raspberry Glaze is the perfect combination of rich chocolate brownie, velvety cheesecake, and bright berry flavor. Every layer brings something special: the dense fudgy brownies provide texture, the cheesecake adds creamy indulgence, and the raspberry glaze delivers a refreshing contrast. The result is an elegant dessert that looks stunning on any dessert table and tastes even better than it looks. Whether you’re celebrating a special occasion or simply treating yourself, this show-stopping cheesecake is guaranteed to leave everyone asking for a second slice. ❤️🍰🍓
Red Velvet Brownie Cheesecake with Raspberry Glaze ❤️🍫🍰