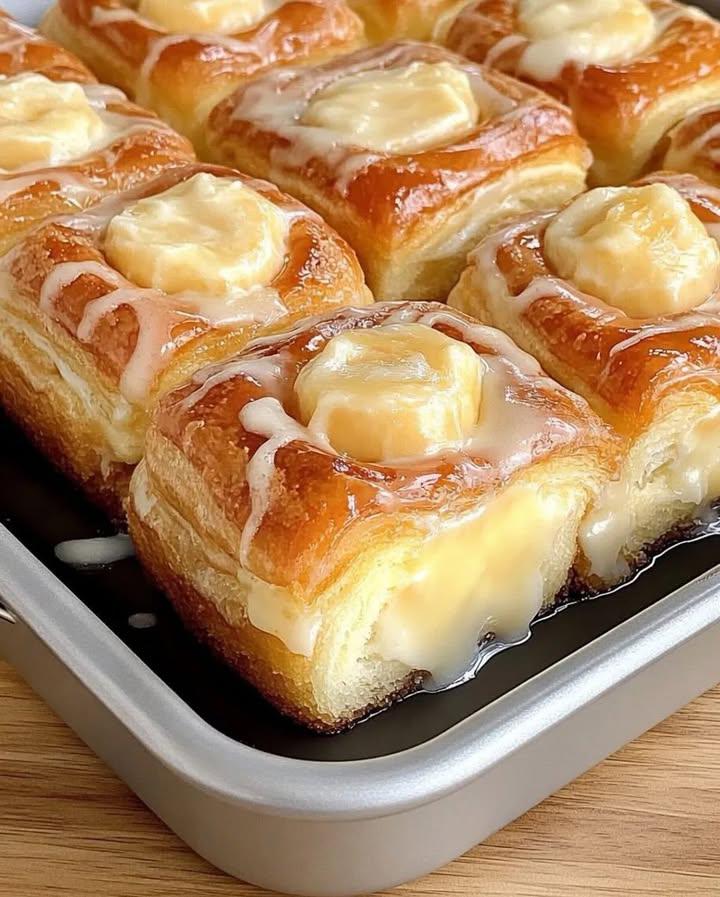
If you’re looking for a breakfast treat that tastes like it came straight from a bakery but takes very little effort to make, this King’s Hawaiian Cheesecake Danish is exactly what you need. Soft, buttery Hawaiian sweet rolls are transformed into a rich, creamy cheesecake-filled pastry with a golden butter topping that makes every bite irresistible. The sweet, pillowy bread perfectly complements the tangy cream cheese filling, creating a dessert or brunch centerpiece that looks impressive while requiring only a handful of simple ingredients.
Whether you’re preparing a weekend brunch, holiday breakfast, baby shower, family gathering, or simply treating yourself, this recipe is guaranteed to become a favorite. Best of all, it comes together in under an hour and tastes even better than many bakery versions.
Why You’ll Love This Recipe
This Danish combines the comforting sweetness of King’s Hawaiian rolls with a smooth cheesecake filling that’s lightly flavored with vanilla. The butter topping bakes into the rolls, giving them an irresistible golden finish while keeping everything moist and tender.
You’ll love this recipe because:
Ready in about 40 minutes
Beginner-friendly
Perfect for breakfast, brunch, or dessert
Rich cheesecake flavor
Soft, buttery texture
Easily customizable with fruit or glazes
Great for feeding a crowd
Ingredients
For the Danish
1 package (12-count) King’s Hawaiian Sweet Rolls
8 ounces cream cheese, softened
⅓ cup granulated sugar
1 large egg
1 teaspoon vanilla extract
For the Butter Topping
¼ cup unsalted butter, melted
Optional Glaze
1 cup powdered sugar
2 tablespoons milk
½ teaspoon vanilla extract
Optional Garnishes
Fresh strawberries
Blueberries
Raspberries
Lemon zest
Powdered sugar
Toasted sliced almonds
Kitchen Equipment
You’ll need:
9×13-inch baking dish
Mixing bowls
Electric mixer or whisk
Measuring cups
Measuring spoons
Pastry brush
Rubber spatula
Cooling rack
Step 1: Prepare the Oven
Preheat your oven to 350°F (175°C).
Lightly grease a 9×13-inch baking dish with butter or nonstick cooking spray.
Step 2: Prepare the Rolls
Without separating the individual rolls, slice the entire package horizontally, creating one top layer and one bottom layer.
Place the bottom half into the prepared baking dish.
Set the tops aside.
Keeping the rolls connected helps the finished Danish resemble one beautiful bakery-style pastry.
Step 3: Make the Cheesecake Filling
In a medium mixing bowl combine:
Softened cream cheese
Granulated sugar
Egg
Vanilla extract
Beat with an electric mixer for about 2–3 minutes until the mixture becomes smooth, creamy, and completely lump-free.
Scrape down the sides of the bowl to ensure everything is evenly mixed.
The filling should have a silky texture.
Step 4: Fill the Danish
Spread the cheesecake mixture evenly over the bottom layer of the rolls.
Use a rubber spatula to spread it all the way to the edges.
Make sure the filling is level so every serving gets plenty of creamy cheesecake.
Step 5: Add the Top Layer
Carefully place the top half of the rolls back over the cheesecake filling.
Gently press down just enough to secure the layers without squeezing out the filling.
Step 6: Butter the Top
Brush the melted butter generously over the tops of the rolls.
Cover every inch for an even golden finish.
The butter helps the tops become beautifully browned while keeping the bread wonderfully soft.
Step 7: Bake
Place the baking dish into the preheated oven.
Bake for 25–30 minutes, or until:
The tops are golden brown
The cheesecake filling is set
The center no longer jiggles excessively
If the tops begin browning too quickly, loosely cover with foil during the last 8–10 minutes of baking.
Step 8: Cool
Remove from the oven.
Allow the Danish to cool for about 15 minutes before slicing.
The filling will continue setting as it cools, making it much easier to serve neat portions.
Optional Vanilla Glaze
While the Danish cools, whisk together:
Powdered sugar
Milk
Vanilla
Mix until completely smooth.
Drizzle generously over the warm Danish for an extra bakery-style finish.
Serving Suggestions
This Danish is delicious warm, but it’s equally enjoyable at room temperature.
Serve it with:
Fresh fruit
Hot coffee
Tea
Orange juice
Hot chocolate
Whipped cream
Vanilla ice cream for dessert
It’s perfect for:
Mother’s Day brunch
Easter breakfast
Christmas morning
Birthday breakfasts
Weekend family brunches
Potlucks
Baby showers
Bridal showers
Delicious Variations
One of the best things about this recipe is how easy it is to customize.
Strawberry Cheesecake Danish
Spread sliced fresh strawberries over the cheesecake filling before replacing the tops.
Blueberry Danish
Scatter fresh blueberries over the filling before baking.
Raspberry Lemon Danish
Add fresh raspberries and a little lemon zest for a bright, refreshing flavor.
Cinnamon Sugar Danish
Sprinkle cinnamon sugar over the butter before baking for a warm, comforting twist.
Chocolate Cheesecake Danish
Mix mini chocolate chips into the cream cheese filling.
Peach Danish
Add thin peach slices before baking for a summery version.
Apple Cinnamon Danish
Layer thin apple slices with a sprinkle of cinnamon for a cozy fall variation.
Tips for Success
Always use softened cream cheese. Cold cream cheese can leave lumps in the filling.
Slice the rolls carefully using a long serrated bread knife to keep the layers even.
Don’t overbake. The cheesecake filling should still have a slight wobble when you remove it from the oven, as it will continue to set while cooling.
Allow the Danish to cool before cutting. This helps the cheesecake filling firm up for cleaner slices.
Use real butter for the richest flavor and best golden finish.
Storage
Store leftovers in an airtight container in the refrigerator for up to 4 days.
Because of the cream cheese filling, refrigeration is recommended.
Reheating
Warm individual portions in the microwave for 15–20 seconds.
You can also reheat the entire Danish in a 300°F (150°C) oven for about 10 minutes until warmed through.
Make-Ahead Instructions
You can assemble the Danish the night before.
Simply prepare the recipe through the assembly stage, cover tightly with plastic wrap, and refrigerate overnight. The next morning, brush with the melted butter just before baking. You may need to add 3–5 extra minutes to the baking time if starting from cold.
Frequently Asked Questions
Can I use flavored cream cheese?
Yes. Strawberry, honey, cinnamon, or even pineapple-flavored cream cheese can add a delicious twist.
Can I freeze it?
Yes. Wrap cooled portions tightly and freeze for up to 2 months. Thaw overnight in the refrigerator before reheating.
Can I add fruit preserves?
Absolutely. Spread a thin layer of strawberry, raspberry, apricot, or blueberry preserves over the cheesecake filling before placing the top layer of rolls back on.
Why are King’s Hawaiian rolls ideal for this recipe?
Their signature sweetness, soft texture, and rich buttery flavor create a pastry-like base without the need to prepare homemade dough, making this recipe both convenient and exceptionally delicious.
With its creamy cheesecake center, buttery golden top, and irresistibly soft Hawaiian rolls, this King’s Hawaiian Cheesecake Danish delivers bakery-quality results with minimal effort. It’s the kind of recipe that disappears quickly at gatherings and earns requests for seconds—and for the recipe itself. Enjoy it warm with a drizzle of vanilla glaze and a cup of coffee, and you’ll have a comforting treat that’s perfect for any occasion.