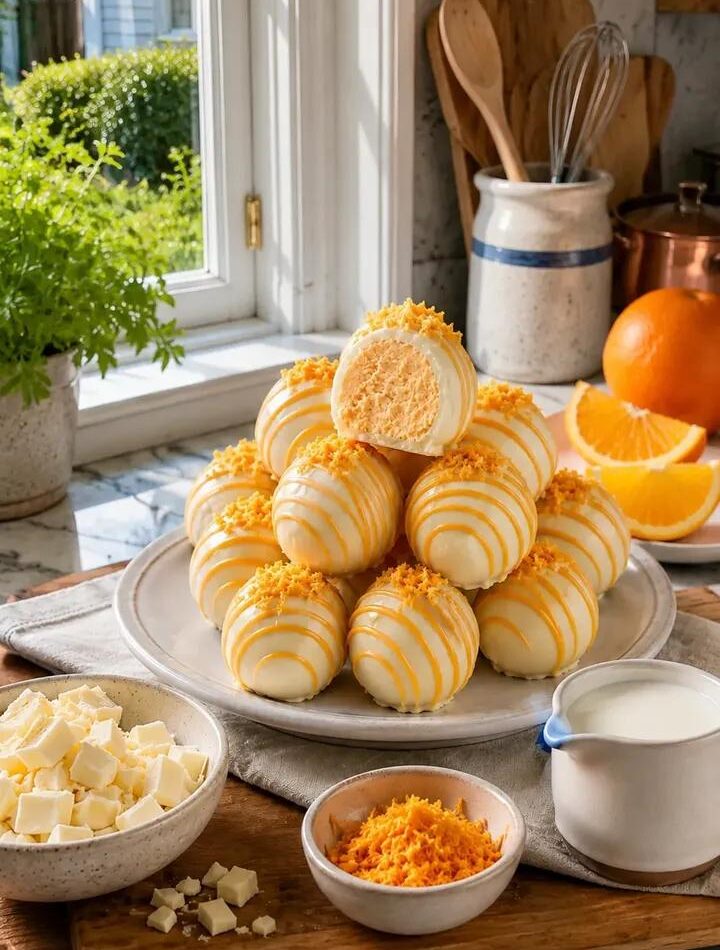
Orange Creamsicle Truffles
If you love the nostalgic flavor of a classic orange creamsicle, these Orange Creamsicle Truffles are the perfect sweet treat. They combine the rich creaminess of white chocolate with the bright, refreshing flavor of orange, creating a dessert that tastes like sunshine in every bite. These elegant truffles are surprisingly easy to make and require only a handful of ingredients, making them ideal for holidays, parties, gift boxes, or simply satisfying a sweet craving.
The smooth white chocolate center melts in your mouth while the citrus notes add a refreshing balance that keeps the truffles from feeling overly rich. Whether you’re an experienced baker or a beginner in the kitchen, this recipe is simple enough to master and impressive enough to share.
Why You’ll Love These Truffles
These truffles capture the beloved combination of vanilla cream and sweet orange found in traditional creamsicle popsicles. The white chocolate provides a luxurious texture, while fresh orange zest and orange extract deliver authentic citrus flavor. They require no baking, can be prepared ahead of time, and look beautiful when coated in powdered sugar, white chocolate, or decorative sprinkles.
The recipe also makes a wonderful homemade gift. Pack the finished truffles in a decorative box or tin, and you’ll have a thoughtful present that’s sure to impress friends and family.
Ingredients
For the Truffle Filling
8 oz (225 g) white chocolate, finely chopped
1/4 cup heavy cream
1 teaspoon fresh orange zest
1/2 teaspoon orange extract
Optional Coatings
Additional melted white chocolate
Powdered sugar
Orange-colored sanding sugar
Finely grated orange zest
White chocolate curls
Coconut flakes
Equipment Needed
Small saucepan
Heatproof bowl
Rubber spatula
Measuring spoons
Baking sheet or tray
Parchment paper
Small cookie scoop or spoon
Refrigerator
Step 1: Prepare the White Chocolate
Begin by finely chopping the white chocolate. Smaller pieces melt more evenly and create a smoother ganache. Place the chopped white chocolate into a heatproof mixing bowl.
Using high-quality white chocolate makes a significant difference in the final flavor. Choose a brand that contains cocoa butter rather than artificial substitutes for the creamiest texture and best taste.
Step 2: Heat the Cream
Pour the heavy cream into a small saucepan and place it over medium heat. Warm the cream until it begins to simmer around the edges. Do not allow it to boil vigorously, as overheating can affect the texture of the chocolate mixture.
Once small bubbles appear around the perimeter of the saucepan, immediately remove it from the heat.
Step 3: Create the Ganache
Pour the hot cream directly over the chopped white chocolate. Allow the mixture to sit undisturbed for about 2 to 3 minutes. This resting period helps soften the chocolate gently.
After the waiting time, stir slowly with a spatula until the mixture becomes completely smooth and glossy. If a few chocolate pieces remain unmelted, place the bowl over a pan of warm water for a few seconds while stirring.
Add the fresh orange zest and orange extract. Stir thoroughly until the flavorings are evenly distributed throughout the ganache.
At this stage, the mixture should smell wonderfully creamy with a bright citrus aroma.
Step 4: Chill the Mixture
Cover the bowl with plastic wrap, pressing it gently onto the surface of the ganache to prevent a skin from forming.
Transfer the bowl to the refrigerator and chill for approximately 2 to 3 hours, or until the mixture is firm enough to scoop and roll.
Patience is important here. If the ganache is too soft, the truffles will be difficult to shape. Proper chilling creates the ideal consistency.
Step 5: Shape the Truffles
Line a baking sheet or tray with parchment paper.
Remove the chilled ganache from the refrigerator. Using a small cookie scoop or spoon, portion out roughly 1-inch balls of the mixture.
Roll each portion between your palms to create smooth, round truffles. If the mixture begins to soften, place it back into the refrigerator for 10 to 15 minutes before continuing.
Arrange the rolled truffles on the prepared tray.
Step 6: Chill Again
Place the tray of formed truffles into the refrigerator for 20 to 30 minutes.
This second chilling period helps the truffles firm up and makes coating them much easier.
Step 7: Add a Coating
You can finish the truffles in several delicious ways.
White Chocolate Coating
Melt additional white chocolate in a microwave-safe bowl using 20-second intervals, stirring between each interval until smooth.
Dip each chilled truffle into the melted chocolate using a fork. Lift it out and allow excess chocolate to drip away before returning it to the parchment-lined tray.
Before the coating sets, sprinkle with a little fresh orange zest or decorative sanding sugar.
Powdered Sugar Coating
Roll each truffle in powdered sugar until fully coated. This creates a soft, elegant finish that resembles freshly fallen snow.
Coconut Coating
Roll the truffles in finely shredded coconut for a tropical variation that pairs beautifully with the orange flavor.
Step 8: Let the Coating Set
Allow coated truffles to rest at room temperature until the chocolate shell hardens.
If you’re using powdered sugar or coconut coatings, they are ready to enjoy immediately after rolling.
Flavor Variations
Vanilla Orange Creamsicle
Add 1 teaspoon pure vanilla extract along with the orange extract for an even more authentic creamsicle flavor.
Orange Almond Truffles
Mix in a few drops of almond extract to create a sophisticated citrus-almond combination.
Chocolate Orange Truffles
Drizzle dark chocolate over the finished truffles for a flavor combination that is both elegant and delicious.
Orange Cheesecake Truffles
Blend a tablespoon of softened cream cheese into the ganache for a subtle cheesecake-inspired twist.
Storage Tips
Store the truffles in an airtight container in the refrigerator for up to one week.
Separate layers with parchment paper to prevent sticking.
For longer storage, freeze the truffles in a sealed container for up to two months. Thaw overnight in the refrigerator before serving.
Serving Suggestions
These Orange Creamsicle Truffles are perfect for:
Holiday dessert platters
Baby showers
Afternoon tea parties
Valentine’s Day gifts
Wedding dessert tables
Homemade edible gifts
Summer gatherings
Serve them slightly chilled for the best texture and flavor. The creamy center becomes wonderfully smooth while the orange flavor remains bright and refreshing.
Final Thoughts
Orange Creamsicle Truffles are a delightful no-bake dessert that combines the luxurious richness of white chocolate with the vibrant taste of fresh oranges. Their silky texture, elegant appearance, and nostalgic flavor make them a crowd-pleasing treat for any occasion. With only a few simple ingredients and minimal effort, you can create a batch of beautiful homemade truffles that look bakery-quality and taste absolutely irresistible. One bite delivers the perfect balance of creamy sweetness and citrus brightness, making these truffles a dessert you’ll want to make again and again. 🍊🍫✨
Orange Creamsicle Truffles