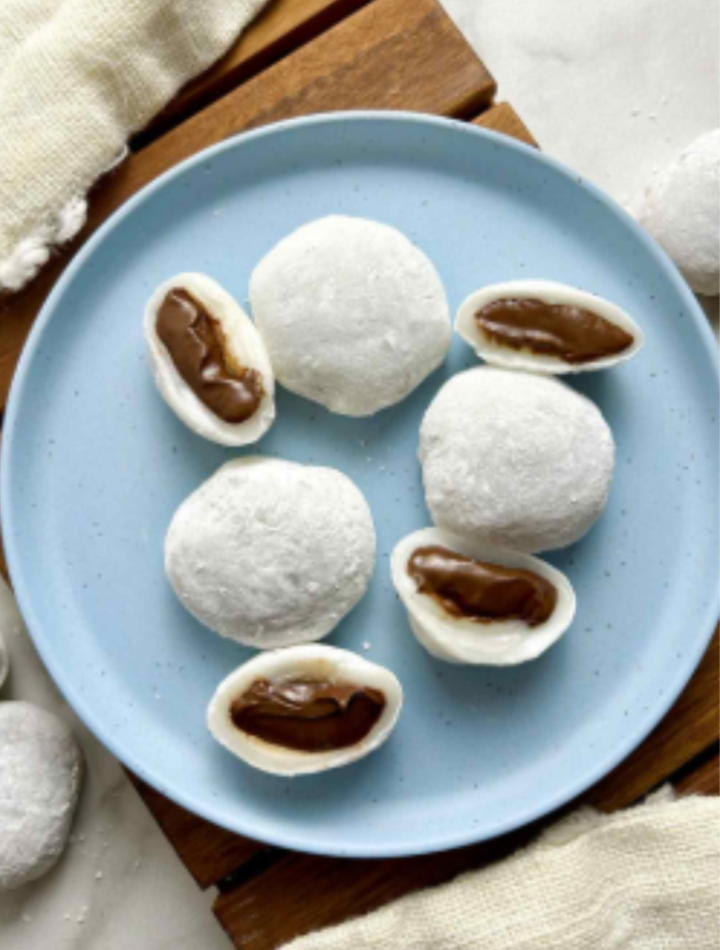
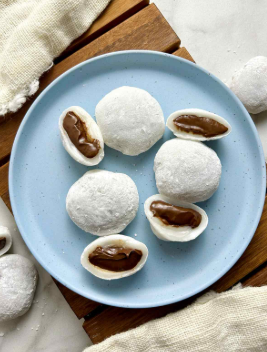
If you’re a fan of chewy desserts and chocolate-hazelnut goodness, this Easy Nutella Mochi Recipe is about to become your new favorite treat. Combining the soft, stretchy texture of traditional Japanese mochi with the rich, creamy flavor of Nutella, this dessert is a delightful fusion of East and West. Every bite offers a perfect balance of pillowy rice dough and luscious chocolate filling, making it an irresistible snack for parties, afternoon tea, or whenever a sweet craving strikes.
The best part? You don’t need advanced baking skills or special equipment to make these delicious mochi at home. With just a handful of ingredients and a little patience, you’ll have a batch of homemade Nutella mochi that looks impressive and tastes even better than store-bought versions.
Whether you’re new to mochi-making or already a fan of Japanese sweets, this recipe is simple, fun, and incredibly rewarding.
What Is Mochi?
Mochi is a traditional Japanese rice cake made from glutinous rice or sweet rice flour (mochiko). It has a unique chewy, elastic texture that makes it unlike any other dessert. While classic mochi is often filled with sweet red bean paste, modern variations feature ice cream, fruit, chocolate, custard, and countless other fillings.
In this version, we’re filling the mochi with Nutella, creating a rich and indulgent center that melts beautifully into the soft rice dough.
Why You’ll Love This Recipe
- Easy beginner-friendly recipe
- No baking required
- Rich Nutella center
- Soft and chewy texture
- Perfect for parties and gifts
- Ready in under an hour
- Fun to make with family
- Customizable with different fillings
Preparation Time
- Prep Time: 20 minutes
- Cooking Time: 10 minutes
- Cooling Time: 20 minutes
- Total Time: 50 minutes
Yield
Makes 12 mochi
Ingredients
For the Nutella Filling
- 12 teaspoons Nutella
- Parchment paper
For the Mochi Dough
- 1 cup sweet rice flour (mochiko)
- ¼ cup granulated sugar
- 1 cup water
- 1 tablespoon whole milk (optional)
- 1 teaspoon vanilla extract
For Dusting
- ½ cup cornstarch
- Additional cornstarch as needed
Optional Decorations
- Cocoa powder
- Crushed hazelnuts
- Powdered sugar
- Melted chocolate drizzle
Step 1: Freeze the Nutella
This is one of the most important steps.
Line a small plate or tray with parchment paper.
Scoop 12 teaspoons of Nutella onto the parchment paper.
Place the tray into the freezer for about 30 minutes.
Freezing the Nutella makes the filling much easier to handle when assembling the mochi.
If the Nutella is too soft, it can quickly become messy during shaping.
While the Nutella freezes, prepare the mochi dough.
Step 2: Make the Mochi Dough
In a microwave-safe bowl, combine:
- Sweet rice flour
- Sugar
- Water
- Vanilla extract
- Milk (if using)
Whisk until completely smooth.
There should be no lumps remaining.
Cover the bowl loosely with plastic wrap or a microwave-safe lid.
Microwave on high for 1 minute.
Carefully remove and stir thoroughly.
Return to the microwave for another minute.
Stir again.
Microwave for a final 30 to 60 seconds.
The dough should transform into a thick, glossy, sticky mass with a slightly translucent appearance.
Cooking times may vary depending on your microwave.
The finished dough should be stretchy and fully cooked.
Step 3: Prepare Your Work Surface
Generously dust a clean countertop or large cutting board with cornstarch.
Mochi dough is extremely sticky, so don’t be shy with the cornstarch.
Transfer the hot dough onto the prepared surface.
Dust the top with additional cornstarch.
Allow it to cool for 5 to 10 minutes until comfortable to handle.
Step 4: Roll and Divide the Dough
Using your hands or a rolling pin dusted with cornstarch, gently flatten the dough.
Roll it to approximately ¼-inch thickness.
Try to keep the thickness as even as possible.
Using a round cookie cutter or drinking glass, cut out 12 circles.
If needed, gather scraps and reroll gently.
Work quickly while the dough remains pliable.
Step 5: Fill the Mochi
Remove the frozen Nutella portions from the freezer.
Place one Nutella scoop in the center of each dough circle.
Carefully lift the edges of the mochi around the filling.
Pinch the seams together firmly.
Continue gathering the edges until the filling is completely enclosed.
Roll gently between your palms to create a smooth ball.
Place the finished mochi seam-side down.
Repeat until all the mochi are assembled.
Step 6: Final Dusting
Lightly brush away excess cornstarch.
You want enough to prevent sticking, but not so much that it affects the flavor.
For extra elegance, dust lightly with cocoa powder or powdered sugar.
You can also drizzle melted chocolate over the tops before serving.
Tips for Perfect Nutella Mochi
Freeze the Filling Thoroughly
This step makes assembly dramatically easier.
The Nutella remains firm while you seal the dough.
Work Quickly
Mochi dough becomes less flexible as it cools.
Assembling while still slightly warm yields the best results.
Use Plenty of Cornstarch
Sticky dough is the biggest challenge when making mochi.
Generous dusting prevents frustration.
Seal Carefully
Pinch the edges tightly to prevent leaks.
Small openings can allow the Nutella to escape.
Don’t Overfill
Too much filling makes shaping difficult and can cause tearing.
Delicious Variations
Nutella Strawberry Mochi
Add a small piece of fresh strawberry alongside the Nutella filling.
The fruit provides freshness and a beautiful flavor contrast.
Nutella Banana Mochi
Use a tiny slice of banana with the Nutella center.
This combination tastes like a gourmet chocolate-banana dessert.
Nutella Hazelnut Crunch Mochi
Mix chopped toasted hazelnuts into the Nutella before freezing.
The added crunch creates an exciting texture.
Double Chocolate Mochi
Add 1 tablespoon cocoa powder to the dough mixture.
This creates a rich chocolate mochi exterior.
Cookies and Cream Nutella Mochi
Mix crushed chocolate sandwich cookies into the Nutella before freezing.
The result is incredibly decadent.
Storage Instructions
Mochi is best enjoyed fresh.
However, leftovers can be stored.
Refrigerator
Store in an airtight container for up to 2 days.
Allow to sit at room temperature for 15 minutes before serving.
Freezer
Freeze individually wrapped mochi for up to 1 month.
Thaw gently in the refrigerator before eating.
Keep in mind that freezing may slightly alter the texture.
Serving Suggestions
These Nutella mochi are delicious on their own, but they also pair wonderfully with:
- Green tea
- Matcha latte
- Coffee
- Hot chocolate
- Fresh berries
- Vanilla ice cream
Arrange them on a dessert platter for an elegant presentation at parties or celebrations.
Nutritional Information
Approximate values per mochi:
- Calories: 120
- Carbohydrates: 20g
- Fat: 4g
- Protein: 2g
- Sugar: 9g
Values may vary depending on portion size and ingredients used.
Common Mistakes to Avoid
Using regular rice flour
Only sweet rice flour (mochiko) creates the proper chewy texture.
Skipping the filling freeze
Soft Nutella becomes difficult to manage.
Undercooking the dough
Properly cooked mochi should look glossy and translucent.
Insufficient cornstarch
Without enough dusting, the dough will stick everywhere.
Overworking the dough
Handle gently to maintain a soft texture.
Final Thoughts
This Easy Nutella Mochi Recipe is the perfect combination of chewy, creamy, and chocolatey indulgence. With its soft mochi shell and rich Nutella center, it offers a delightful twist on traditional Japanese sweets while remaining incredibly approachable for home cooks. Whether you’re making them for a special occasion, a cozy dessert night, or simply to satisfy your sweet tooth, these little treats are guaranteed to impress.
Once you’ve mastered this version, feel free to experiment with different fillings, flavors, and toppings. One thing is certain: after tasting homemade Nutella mochi, you’ll want to make them again and again. Enjoy every chewy, chocolate-filled bite! 🍫🍡✨