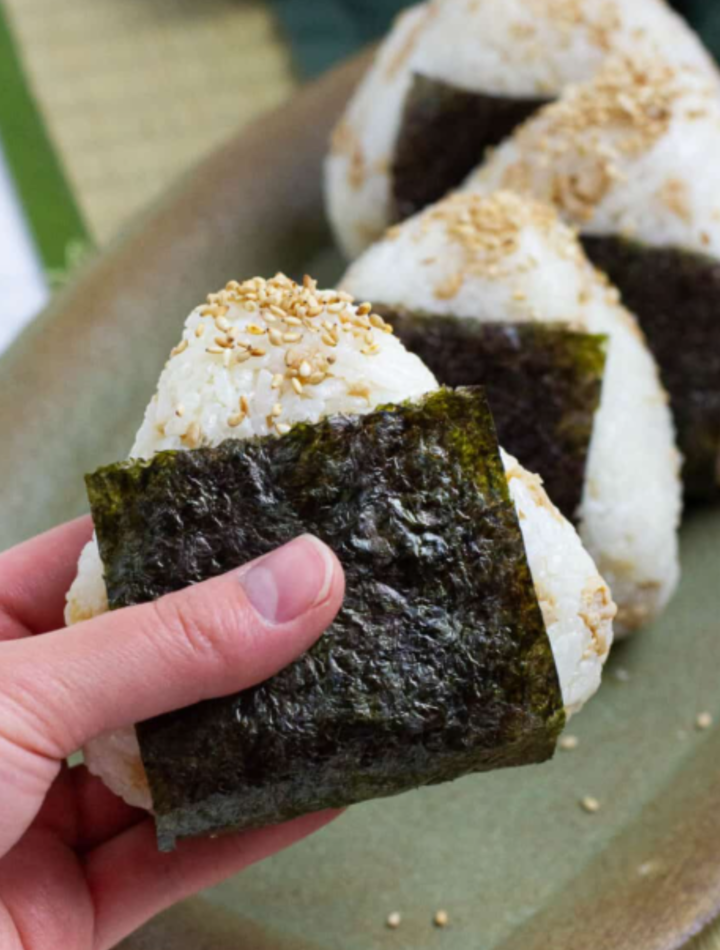
If you’re looking for a delicious, portable, and budget-friendly meal that can be prepared ahead of time, Chicken Onigiri is the perfect solution. These iconic Japanese rice balls are beloved for their simplicity, versatility, and satisfying flavor. Filled with savory seasoned chicken and wrapped in crisp nori seaweed, onigiri make an excellent lunch, snack, picnic food, or meal-prep option for busy weeks.
Unlike sushi, onigiri are incredibly easy to make at home and require no special rolling skills. With fluffy rice, flavorful chicken filling, and a convenient handheld shape, these rice balls are both practical and comforting. Whether you’re packing lunchboxes, preparing grab-and-go breakfasts, or looking for a healthy afternoon snack, this chicken onigiri recipe will quickly become a favorite.
What Is Onigiri?
Onigiri, also known as omusubi, are traditional Japanese rice balls typically shaped into triangles, rounds, or cylinders. They are usually made from seasoned Japanese short-grain rice and filled with a variety of ingredients such as salmon, tuna mayo, pickled plum, or chicken.
The rice is gently molded around the filling and often wrapped in a strip of nori seaweed for easier handling. Onigiri are commonly sold in convenience stores throughout Japan and are considered one of the country’s most popular comfort foods.
This chicken version offers a protein-rich filling that’s perfect for meal prep and can be customized in countless ways.
Why You’ll Love This Recipe
Easy beginner-friendly recipe
Great for meal prep
Portable and lunchbox-friendly
High in protein
Freezer-friendly
Budget-conscious ingredients
Naturally gluten-free (with gluten-free soy sauce)
Delicious hot or cold
Preparation Time
Prep Time: 20 minutes
Cook Time: 20 minutes
Assembly Time: 15 minutes
Total Time: 55 minutes
Yield
Makes 8 large onigiri
Ingredients
For the Rice
3 cups cooked Japanese short-grain rice
1 teaspoon salt
1 tablespoon rice vinegar (optional)
For the Chicken Filling
2 boneless skinless chicken thighs (or 1 large breast)
1 tablespoon soy sauce
1 tablespoon mirin
1 teaspoon sesame oil
1 teaspoon sugar
1 garlic clove, minced
1 teaspoon grated fresh ginger
For Assembly
4 sheets nori seaweed, cut into strips
Bowl of water for wetting hands
Additional salt for seasoning hands
Optional Toppings
Toasted sesame seeds
Furikake seasoning
Chopped green onions
Japanese mayonnaise
Chili flakes
Step 1: Cook the Rice
The foundation of great onigiri is properly cooked rice.
Rinse the rice several times under cold water until the water runs mostly clear. This removes excess starch and helps create the ideal texture.
Cook according to package directions or in a rice cooker.
Once cooked, allow the rice to rest for 10 minutes before fluffing gently with a rice paddle or fork.
Mix in the salt and optional rice vinegar while the rice is still warm.
Set aside and keep covered so the rice remains soft.
Warm rice is much easier to shape than cold rice.
Step 2: Prepare the Chicken Filling
While the rice cooks, prepare the flavorful chicken filling.
In a small bowl, combine:
Soy sauce
Mirin
Sesame oil
Sugar
Garlic
Ginger
Mix thoroughly.
Heat a skillet over medium heat.
Add the chicken and cook for about 5 minutes per side until fully cooked.
Pour the sauce mixture over the chicken.
Allow it to simmer for several minutes until the sauce thickens slightly and coats the meat.
Remove from heat and let cool slightly.
Using two forks, shred the chicken into fine pieces.
Return the shredded chicken to the pan and toss it with the remaining sauce.
The filling should be moist, flavorful, and easy to scoop.
Allow it to cool before assembling the onigiri.
Step 3: Prepare Your Workstation
Before shaping, organize your workspace.
You’ll need:
Warm rice
Chicken filling
Small bowl of water
Salt
Nori strips
Clean plate or tray
Wet hands are essential because rice is naturally sticky.
Keep a small bowl of water nearby throughout the shaping process.
Step 4: Shape the Onigiri
Wet your hands lightly with water.
Rub a small pinch of salt onto your palms.
This helps season the exterior and prevents sticking.
Take about ½ cup of warm rice and place it in one hand.
Flatten it slightly to create a shallow indentation.
Place 1 to 2 tablespoons of chicken filling in the center.
Cover the filling with a little more rice.
Gently press the rice around the filling to seal it completely.
Now shape the rice into a triangle using both hands.
Don’t squeeze too hard.
The goal is to create a firm shape while maintaining the fluffy texture of the rice.
Repeat with the remaining ingredients.
You should end up with approximately 8 onigiri.
Step 5: Add the Nori
Wrap a strip of nori around the bottom of each rice ball.
The seaweed serves several purposes:
Makes onigiri easier to hold
Adds flavor and texture
Keeps hands clean while eating
For maximum crispness, attach the nori shortly before serving.
If meal prepping, store the nori separately and add it when ready to eat.
Tips for Perfect Onigiri
Use Japanese Rice
Short-grain rice contains the right amount of starch to hold its shape.
Long-grain rice tends to fall apart.
Keep Rice Warm
Warm rice molds easily and creates stronger rice balls.
Don’t Overfill
Too much filling can cause the onigiri to crack.
A modest amount works best.
Wet Your Hands Frequently
This prevents sticking and makes shaping much easier.
Avoid Compressing Too Much
Onigiri should be firm but still tender.
Over-packing creates dense rice balls.
Delicious Variations
Spicy Chicken Onigiri
Mix the chicken with:
Sriracha
Japanese mayo
Chili flakes
The result is creamy, spicy, and incredibly satisfying.
Teriyaki Chicken Onigiri
Replace the sauce with homemade teriyaki sauce for a sweeter flavor profile.
Add toasted sesame seeds for extra crunch.
Chicken Avocado Onigiri
Add small avocado cubes to the filling.
This creates a creamy texture and adds healthy fats.
Chicken and Corn Onigiri
Mix sweet corn kernels into the chicken.
Kids especially love this variation.
Chicken Furikake Onigiri
Mix furikake seasoning directly into the rice for extra umami and color.
Meal Prep Instructions
Chicken onigiri are ideal for preparing ahead.
Refrigerator Storage
Store assembled rice balls in an airtight container.
They stay fresh for up to 3 days.
Wrap individually in plastic wrap for convenient grab-and-go meals.
Freezer Storage
Wrap each onigiri tightly in plastic wrap.
Place inside a freezer-safe bag.
Freeze for up to 1 month.
To reheat:
Microwave for 1 to 2 minutes
Let rest for several minutes
Add fresh nori before serving
Serving Ideas
Chicken onigiri pair wonderfully with:
Miso soup
Japanese cucumber salad
Edamame
Pickled vegetables
Tamagoyaki (Japanese omelet)
Fresh fruit
For a complete bento-style lunch, pack two onigiri alongside vegetables and a small protein side.
Nutritional Benefits
Each onigiri provides a balanced combination of:
Complex carbohydrates from rice
Lean protein from chicken
Healthy fats from sesame oil
Essential vitamins and minerals
They’re filling without being heavy, making them ideal for school lunches, work meals, or post-workout snacks.
Common Mistakes to Avoid
Using cold rice
Cold rice becomes difficult to shape and tends to crack.
Filling while hot
Hot filling releases steam that can weaken the rice structure.
Overstuffing
Too much filling causes breakage.
Forgetting salt
Lightly salted hands improve flavor significantly.
Using dry chicken
A moist filling creates the best texture and taste.
Final Thoughts
Easy Chicken Onigiri are one of the most practical and satisfying meal-prep foods you can make. With fluffy seasoned rice, savory ginger-soy chicken, and crisp nori seaweed, every bite delivers comforting Japanese-inspired flavors. They are portable, customizable, freezer-friendly, and perfect for busy lifestyles.
Whether you’re preparing lunches for the week, packing a picnic, or simply exploring Japanese home cooking, these delicious rice balls are guaranteed to become a regular part of your meal rotation. Once you master the basic technique, you’ll discover endless filling possibilities and always have a tasty homemade snack ready to enjoy. 🍙✨🐔🇯🇵