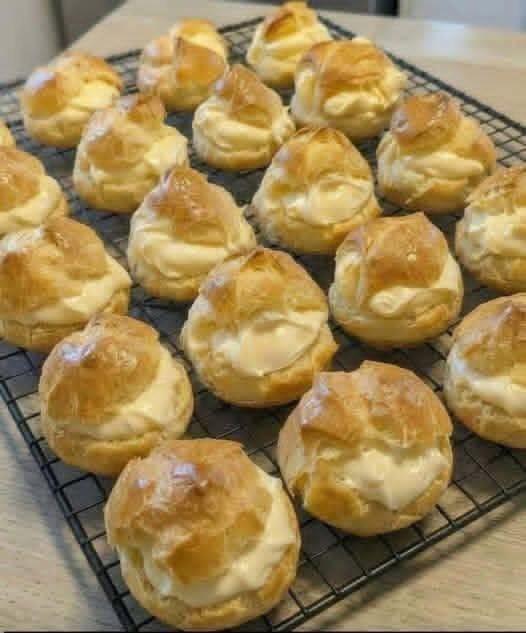
Classic Cream Puffs Recipe ☁️🍦There’s something timeless and magical about homemade cream puffs. With their delicate golden shells, airy centers, and rich vanilla whipped cream filling, these elegant pastries feel like they came straight from a French bakery. The first bite is pure perfection — a crisp, buttery exterior giving way to soft clouds of sweet cream. Despite how fancy they look, cream puffs are surprisingly simple to make once you understand the basics of choux pastry.Whether you’re preparing dessert for a family gathering, a holiday table, afternoon tea, or simply craving something bakery-style at home, these classic cream puffs are guaranteed to impress. Light, creamy, and beautifully balanced in sweetness, they’re one of those desserts everyone reaches for first.Why You’ll Love These Cream PuffsThese cream puffs are:Light and airyCrisp on the outsideSoft and hollow insideFilled with fluffy vanilla whipped creamPerfect for special occasions or everyday treatsEasy to customize with chocolate, fruit, or custard fillingsThe secret lies in the choux pastry — a unique dough cooked on the stovetop before baking. As the pastries bake, steam forms inside the dough, creating their signature hollow centers without any baking powder or yeast.Once you master this simple technique, you’ll want to make cream puffs again and again.
IngredientsFor the Choux Pastry 📝1 cup water 💧1/2 cup unsalted butter 🧈1/4 tsp salt 🧂1 cup all-purpose flour 🌾4 large eggs 🥚🥚🥚🥚For the Filling 🍦2 cups heavy whipping cream 🥛1/3 cup powdered sugar 🍚1 tsp vanilla extract ✨Optional ToppingsPowdered sugar for dustingMelted chocolate drizzle 🍫Fresh berries 🍓Caramel sauce
Step 1: Prepare the Oven and Baking SheetStart by preheating your oven to 425°F (220°C). Proper heat is essential because cream puffs rely on steam to rise.Line a large baking sheet with parchment paper. This prevents sticking and helps the pastries bake evenly.Avoid greasing the tray heavily because excess oil can flatten the dough during baking.
Step 2: Make the Choux Pastry DoughIn a medium saucepan, combine:WaterButterSaltPlace the pan over medium heat and stir until the butter completely melts. Bring the mixture to a gentle boil.Once boiling, immediately add the flour all at once. Stir quickly using a wooden spoon or sturdy spatula.At first, the mixture may look lumpy, but keep stirring vigorously. Within a minute or two, the dough will become smooth and pull away from the sides of the pan.You’ll notice a thin film forming on the bottom of the saucepan — that’s exactly what you want.This step cooks the flour slightly and removes excess moisture, which helps create airy cream puffs.
Step 3: Cool the Dough SlightlyRemove the saucepan from the heat and let the dough cool for about 5 minutes.This is important because if the dough is too hot, it can cook the eggs when added.The dough should still feel warm but not steaming hot.
Step 4: Add the EggsAdd the eggs one at a time, mixing thoroughly after each addition.At first, the dough may appear slippery or separated, but continue stirring. Eventually it will become smooth, glossy, and thick.The finished dough should slowly fall from the spoon in a ribbon shape.This glossy texture is the key to beautiful cream puffs.
Step 5: Pipe or Scoop the DoughTransfer the dough into a piping bag fitted with a large round tip.Pipe small mounds onto the prepared baking sheet, spacing them about 2 inches apart.If you don’t have a piping bag, you can simply use two spoons to scoop the dough.Dip your finger in water and gently smooth any peaks on top of the dough to prevent burning.Each puff should be about the size of a golf ball.
Step 6: Bake Until Golden and PuffyPlace the tray into the preheated oven and bake for:15 minutes at 425°F (220°C)Then reduce heat to 375°F (190°C)Bake another 20–25 minutesThe cream puffs should become beautifully golden brown and feel light and crisp.Do NOT open the oven door during baking. Sudden temperature changes can cause the puffs to collapse.The shells should sound slightly hollow when tapped.
Step 7: Cool CompletelyRemove the cream puffs from the oven and transfer them to a cooling rack.For extra crispness, poke a tiny hole in the side of each puff to release steam.Allow them to cool completely before filling.Warm shells can melt the whipped cream filling.
Step 8: Make the Vanilla Whipped Cream FillingIn a large chilled bowl, combine:Heavy whipping creamPowdered sugarVanilla extractUsing a hand mixer or stand mixer, beat until stiff peaks form.The cream should be smooth, fluffy, and hold its shape well.Be careful not to overmix or the cream may become grainy.For best results, chill the bowl and beaters beforehand.
Step 9: Fill the Cream PuffsOnce the shells are completely cool, slice them in half horizontally.Spoon or pipe generous amounts of whipped cream into the center.Place the tops back on gently.You can also fill them using a piping tip inserted into the side for a bakery-style appearance.
Step 10: Decorate and ServeDust the tops with powdered sugar for a classic finish.You can also drizzle melted chocolate over the cream puffs or serve them with fresh berries for extra elegance.Serve immediately for the best texture and flavor.The contrast between crisp pastry and creamy filling is absolutely irresistible.
Tips for Perfect Cream Puffs1. Measure CarefullyChoux pastry is sensitive to ingredient ratios. Accurate measurements help ensure proper puffing.2. Don’t Skip Cooling the DoughAdding eggs to very hot dough can scramble them.3. Bake Until Deep GoldenUnderbaked cream puffs collapse easily. A rich golden color means the shells are dry enough inside.4. Avoid Opening the Oven EarlySteam is essential for rise. Opening the oven too soon can flatten the pastries.5. Fill Just Before ServingCream-filled puffs soften over time, so they’re best enjoyed fresh.
Delicious VariationsChocolate Cream Puffs 🍫Add melted chocolate ganache on top or mix cocoa powder into the whipped cream.Strawberry Cream Puffs 🍓Fold chopped strawberries into the whipped cream filling.Custard-Filled Cream Puffs 🍮Replace whipped cream with vanilla pastry cream for a traditional French-style dessert.Coffee Cream Puffs ☕Add espresso powder to the whipped cream for a mocha flavor.
How to Store Cream PuffsUnfilled cream puff shells can be stored in an airtight container at room temperature for up to 2 days.Filled cream puffs should be refrigerated and enjoyed within 24 hours.You can also freeze unfilled shells for up to 2 months. Re-crisp them in the oven before filling.
Final ThoughtsClassic cream puffs are one of those desserts that never go out of style. They’re elegant enough for celebrations yet simple enough to make anytime you want something special. The delicate pastry, silky whipped cream, and beautiful presentation create a dessert that feels luxurious with every bite.Once you see how easy homemade choux pastry can be, you’ll discover an entirely new world of pastries to create. From éclairs to profiteroles, this simple dough becomes the foundation for countless bakery favorites.Serve these cream puffs with coffee, tea, or hot chocolate, and watch them disappear within minutes. One bite of these airy, creamy pastries and you’ll understand why they’ve remained a beloved dessert for generations.
Classic Cream Puffs Recipe