Creamy Biscoff Cheesecake Bars with Cookie Butter Topping
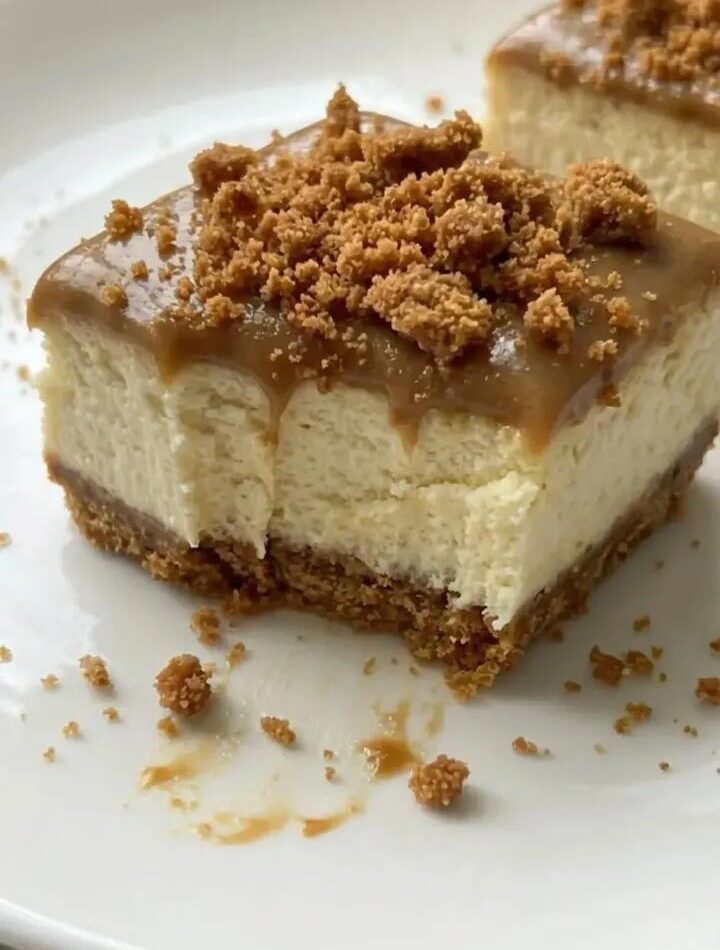
Creamy Biscoff Cheesecake Bars with Cookie Butter ToppingIf you love rich cheesecake and the warm caramelized flavor of Biscoff cookies, these Creamy Biscoff Cheesecake Bars are about to become your favorite dessert. Every bite is layered with buttery cookie crust, silky smooth cheesecake filling, and a dreamy cookie butter topping that melts in your mouth. They are sweet, creamy, slightly spiced, and incredibly satisfying without being overly complicated to make.These cheesecake bars are perfect for holidays, birthdays, coffee dates, bake sales, family gatherings, or those evenings when you simply want a luxurious homemade dessert. The best part is that they can be made ahead of time, and they taste even better after chilling overnight. The flavor of Biscoff deepens as the bars rest, giving you an even richer and creamier result.The crunchy cookie crust pairs beautifully with the smooth cheesecake center, while the melted cookie butter topping creates a glossy finish that looks bakery-worthy. Whether you are serving these at a dinner party or enjoying one straight from the fridge with coffee, these bars always impress.IngredientsFor the Cookie Crust1½ cups Biscoff cookie crumbs¼ cup unsalted butter, melted1 tablespoon brown sugar (optional)For the Cheesecake Filling16 oz cream cheese, softened½ cup granulated sugar¼ cup sour cream or Greek yogurt¼ cup smooth Biscoff spread1 teaspoon vanilla extract2 large eggsFor the Cookie Butter Topping½ cup smooth Biscoff spread, meltedCrushed Biscoff cookies for garnishOptional whipped cream for servingEquipment Needed8x8-inch baking panParchment paperMixing bowlsHand mixer or stand mixerSpatulaMeasuring cups and spoonsStep 1: Prepare the Baking PanStart by preheating your oven to 325°F (163°C). Line an 8×8-inch baking pan with parchment paper, leaving extra paper hanging over the sides. This makes it easy to lift the cheesecake bars out of the pan later.Lightly grease the parchment paper to prevent sticking. Preparing the pan properly ensures clean slices and beautiful presentation.Step 2: Make the Cookie CrustPlace the Biscoff cookies into a food processor and pulse until they become fine crumbs. If you do not have a food processor, place the cookies in a sealed plastic bag and crush them with a rolling pin.Transfer the crumbs to a bowl and mix with melted butter and brown sugar. The texture should resemble wet sand. When pressed together between your fingers, the mixture should hold its shape.Pour the crumb mixture into the prepared pan and press it down firmly into an even layer. Use the bottom of a measuring cup or glass to compact the crust tightly. This helps create a sturdy base that will not crumble apart when sliced.Bake the crust for 8–10 minutes. Remove it from the oven and allow it to cool slightly while preparing the filling.Step 3: Prepare the Cheesecake FillingIn a large mixing bowl, beat the softened cream cheese until completely smooth and creamy. This step is important because lumps in the cream cheese can affect the final texture of the cheesecake.Add the granulated sugar and continue mixing until light and fluffy. Then add the sour cream or Greek yogurt, Biscoff spread, and vanilla extract. Mix until fully combined.The Biscoff spread adds a warm caramel flavor with hints of cinnamon and spice that make these cheesecake bars truly irresistible.Next, add the eggs one at a time. Mix on low speed after each addition just until combined. Avoid overmixing once the eggs are added because too much air can cause cracks during baking.The filling should now look silky smooth, thick, and creamy.Step 4: Assemble the Cheesecake BarsPour the cheesecake filling over the cooled cookie crust. Use a spatula to spread the mixture evenly into the corners of the pan.Gently tap the pan on the counter a few times to remove any trapped air bubbles. This helps the cheesecake bake evenly and creates a smoother surface.Bake for 32–38 minutes, or until the edges are set and the center still has a slight jiggle. The cheesecake will continue to firm up as it cools.Do not overbake. Overbaked cheesecake can become dry instead of creamy.Step 5: Cool the Cheesecake ProperlyOnce baked, remove the cheesecake bars from the oven and allow them to cool at room temperature for about 45 minutes.After cooling slightly, transfer the pan to the refrigerator and chill for at least 4 hours, though overnight is best. Chilling is essential because it allows the cheesecake to fully set and develop its rich flavor.Patience is rewarded here. Cold cheesecake slices more neatly and tastes extra creamy.Step 6: Add the Cookie Butter ToppingWhen the cheesecake has fully chilled, melt the remaining Biscoff spread in the microwave for about 15–20 seconds until smooth and pourable.Pour the melted cookie butter over the chilled cheesecake and spread it evenly with a spatula. The glossy topping creates a beautiful finish and adds another layer of rich Biscoff flavor.Sprinkle crushed Biscoff cookies on top for texture and decoration.For an extra indulgent touch, add swirls of whipped cream before serving.Step 7: Slice and ServeLift the cheesecake out of the pan using the parchment paper overhang. Place it on a cutting board and use a sharp knife to slice into bars.For the cleanest slices, wipe the knife clean between cuts. This keeps the layers looking smooth and professional.Serve chilled for the best texture and flavor.Tips for the Best Cheesecake BarsUse Room Temperature IngredientsSoftened cream cheese blends more smoothly and prevents lumps in the filling.Do Not OvermixOvermixing incorporates too much air, which can lead to cracking while baking.Chill OvernightAlthough four hours works, overnight chilling gives the cheesecake the ultimate creamy texture.Use Full-Fat Cream CheeseFull-fat cream cheese provides the richest flavor and smoothest consistency.Add Extra TextureSprinkle additional crushed cookies on top or drizzle with melted chocolate for a bakery-style finish.Flavor VariationsThese cheesecake bars are delicious as written, but you can also customize them:Add mini chocolate chips to the fillingSwirl melted dark chocolate into the batterTop with caramel drizzleAdd chopped toasted pecans for crunchUse chocolate cookie crust instead of Biscoff crumbsStorage InstructionsStore the cheesecake bars in an airtight container in the refrigerator for up to 5 days. The flavor actually improves after a day or two.You can also freeze them. Wrap individual bars tightly in plastic wrap and store in a freezer-safe container for up to 2 months. Thaw overnight in the refrigerator before serving.Why Everyone Loves These Cheesecake BarsThese Creamy Biscoff Cheesecake Bars combine everything people love in a dessert: buttery crust, creamy filling, rich caramelized flavor, and a smooth cookie butter topping. They feel elegant enough for special occasions yet simple enough for beginner bakers.The balance of textures makes every bite unforgettable. The crunchy cookie base contrasts perfectly with the velvety cheesecake center, while the melted Biscoff topping adds pure decadence.Whether you serve them with coffee, tea, or a glass of milk, these cheesecake bars are guaranteed to disappear quickly. One bite is never enough, and everyone will ask for the recipe after tasting them.