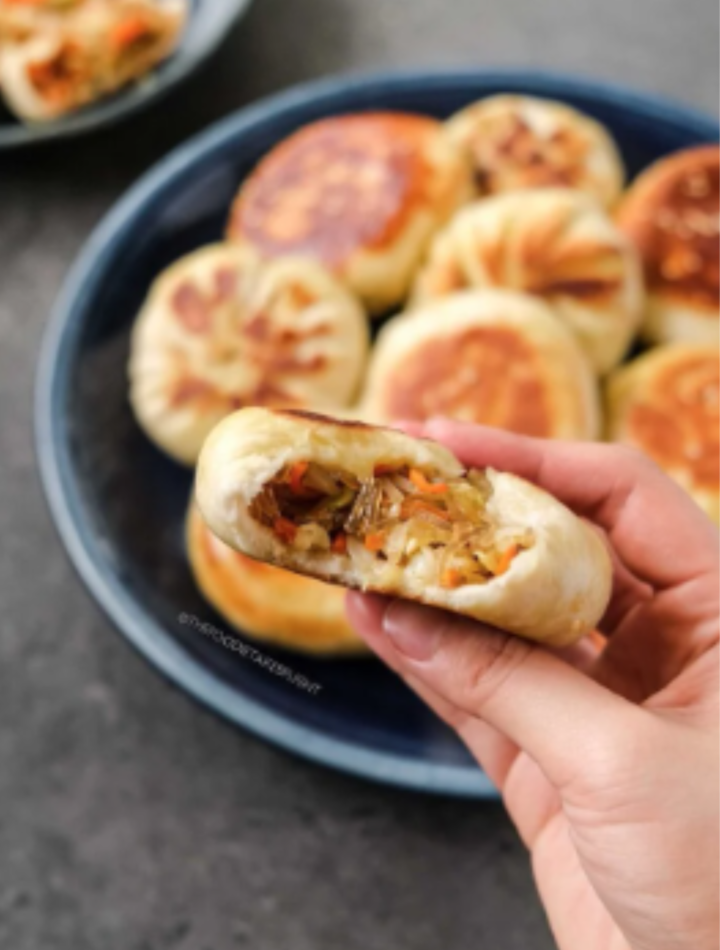
If you’re looking for a comforting, budget-friendly, and incredibly satisfying homemade snack, these Crispy Cabbage & Noodle Stuffed Buns are the perfect recipe to try. Combining fluffy homemade bao dough with a savory filling of tender cabbage, springy noodles, aromatic garlic, and fresh vegetables, these pan-fried buns deliver the perfect balance of crispy bottoms and soft, pillowy tops. They’re inspired by traditional Chinese pan-fried buns but feature a simple vegetarian filling that’s easy to prepare using everyday ingredients.
These stuffed buns are ideal for lunch, dinner, meal prep, or as an appetizer for family gatherings. The filling is packed with flavor, while the golden, crispy exterior adds a delightful crunch that contrasts beautifully with the soft dough. Best of all, this recipe is beginner-friendly and doesn’t require any special equipment beyond a skillet with a lid.
Why You’ll Love This Recipe
There are plenty of reasons to make these crispy veggie bao buns:
Crispy golden bottoms with soft, fluffy tops
Packed with fresh vegetables and satisfying noodles
Budget-friendly ingredients
Perfect for meal prep and freezing
Naturally vegetarian and easy to customize
Great as a snack, appetizer, or main meal
Restaurant-quality results at home
Delicious with your favorite dipping sauce
Whether you’re a longtime bao lover or trying stuffed buns for the first time, this recipe is sure to become a favorite.
Ingredients
For the Dough
3 cups (375 g) all-purpose flour
2 teaspoons instant yeast
1 tablespoon sugar
1 teaspoon salt
1 tablespoon vegetable oil
1 cup (240 ml) warm water
For the Filling
3 cups finely shredded green cabbage
100 g dried rice noodles or vermicelli
2 carrots, grated
4 green onions, sliced
3 garlic cloves, minced
1 tablespoon fresh ginger, grated
2 tablespoons soy sauce
1 tablespoon sesame oil
1 teaspoon rice vinegar
½ teaspoon white pepper
1 teaspoon sugar
1 tablespoon vegetable oil
For Cooking
2 tablespoons vegetable oil
½ cup water
Sesame seeds (optional)
Chopped green onions for garnish
Kitchen Equipment
Large mixing bowl
Rolling pin
Large skillet with lid
Steamer basket (optional)
Wooden spoon
Sharp knife
Cheese grater
Colander
Step 1: Prepare the Dough
In a large bowl, combine the flour, instant yeast, sugar, and salt.
Add the warm water and vegetable oil. Mix until a rough dough forms, then knead for about 8–10 minutes until smooth and elastic. If the dough feels sticky, add a small amount of flour. If it seems dry, add a teaspoon of water at a time.
Place the dough in a lightly oiled bowl, cover with a clean towel or plastic wrap, and let it rise in a warm place for about 1 to 1½ hours, or until doubled in size.
Step 2: Cook the Noodles
While the dough rises, prepare the noodles according to the package instructions. Drain well and rinse briefly under cold water to stop the cooking process.
Use kitchen scissors or a sharp knife to cut the noodles into short pieces. This makes the filling much easier to wrap and eat.
Step 3: Make the Vegetable Filling
Heat one tablespoon of vegetable oil in a large skillet over medium heat.
Add the garlic and grated ginger, stirring for about 30 seconds until fragrant.
Add the shredded cabbage and grated carrots. Cook for 5–6 minutes, stirring frequently, until the vegetables soften but still retain a little texture.
Mix in the chopped noodles, sliced green onions, soy sauce, sesame oil, rice vinegar, sugar, and white pepper. Stir well so the noodles absorb the flavorful sauce.
Cook for another 2 minutes, then remove from the heat and let the filling cool completely before assembling the buns.
Cooling the filling prevents the dough from becoming soggy and makes shaping much easier.
Step 4: Divide the Dough
Once the dough has doubled in size, gently punch it down to release excess air.
Transfer it to a lightly floured surface and divide it into 12 equal portions.
Roll each portion into a smooth ball, cover with a towel, and let them rest for 10 minutes. This short resting time relaxes the gluten, making the dough easier to roll out.
Step 5: Shape the Buns
Flatten each dough ball into a circle about 4 to 5 inches (10–12 cm) wide. Keep the center slightly thicker than the edges so the filling stays secure.
Place 2 to 3 tablespoons of the cooled cabbage and noodle filling in the center.
Gather the edges of the dough, pleating as you go, and pinch tightly to seal the bun. Place each bun seam-side down on a lightly floured surface and cover while you finish the remaining buns.
Step 6: Pan-Fry and Steam
Heat 2 tablespoons of vegetable oil in a large nonstick skillet over medium heat.
Arrange the buns in the skillet with a little space between them. Cook for about 3–4 minutes until the bottoms become beautifully golden and crisp.
Carefully pour ½ cup of water into the skillet and immediately cover with a lid. The water will create steam, cooking the dough until light and fluffy.
Steam for 8–10 minutes, or until the water has evaporated.
Remove the lid and continue cooking for another 2–3 minutes to crisp the bottoms once more.
Step 7: Garnish and Serve
Transfer the buns to a serving plate.
Sprinkle with sesame seeds and chopped green onions if desired.
Serve warm with soy sauce, chili oil, black vinegar, or your favorite dipping sauce.
The contrast between the crispy base and fluffy top is best enjoyed fresh from the pan.
Serving Suggestions
These stuffed buns are satisfying on their own but pair wonderfully with:
Hot and sour soup
Miso soup
Asian cucumber salad
Pickled vegetables
Steamed broccoli
Kimchi
Garlic chili sauce
Sweet chili sauce
For a complete meal, serve them alongside a fresh salad or a bowl of vegetable soup.
Tips for Success
Allow the filling to cool before stuffing the buns.
Do not overfill, or the dough may tear.
Seal each bun tightly to keep the filling inside.
Keep unused dough covered to prevent it from drying out.
Avoid overcrowding the skillet so the buns cook evenly.
Let the buns rest for a few minutes after cooking before serving.
Delicious Variations
One of the best things about this recipe is how easy it is to customize.
Mushroom Version
Add finely chopped mushrooms for a deeper, earthy flavor.
Spicy Veggie Bao
Mix chili flakes, chili crisp, or chopped fresh chilies into the filling.
Tofu Filling
Add crumbled firm tofu sautéed with soy sauce for extra protein.
Spinach and Cheese
Mix cooked spinach with shredded mozzarella or mild cheddar for a fusion twist.
Kimchi Buns
Replace part of the cabbage with chopped kimchi for a tangy, spicy kick.
Curry Vegetable Filling
Season the vegetables with mild curry powder for a warm, aromatic variation.
Storage
Store cooled buns in an airtight container in the refrigerator for up to 4 days.
Reheat them in a skillet with a splash of water and a lid to restore their crispy bottoms and soft interiors.
A microwave works for convenience, though the buns will lose some of their crispness.
Freezing Instructions
These buns freeze beautifully, making them ideal for meal prep.
Freeze cooked or uncooked buns on a baking tray until firm, then transfer them to a freezer-safe bag or container.
Store for up to 3 months.
Cook frozen uncooked buns directly from the freezer, adding a few extra minutes to the steaming time. Reheat cooked buns in a covered skillet with a little water until heated through.
Nutritional Information (Per Bun)
Approximate values:
Calories: 220
Protein: 6 g
Carbohydrates: 38 g
Fat: 5 g
Saturated Fat: 1 g
Fiber: 3 g
Sugar: 4 g
Sodium: 350 mg
Nutritional values may vary depending on the ingredients used.
Final Thoughts
These Crispy Cabbage & Noodle Stuffed Buns are proof that simple ingredients can create extraordinary flavors. The combination of fluffy homemade dough, savory vegetable filling, and irresistibly crispy bottoms makes every bite comforting and satisfying. Whether you’re preparing them for a family dinner, packing them into lunchboxes, or serving them as a crowd-pleasing appetizer, these veggie bao buns are guaranteed to impress.
Once you’ve mastered the basic recipe, don’t hesitate to experiment with different vegetables, spices, or proteins to make them your own. Homemade stuffed buns may take a little time, but the delicious aroma, golden crisp texture, and warm, flavorful filling make every step well worth the effort. Enjoy them fresh from the skillet with your favorite dipping sauce for a truly memorable homemade meal.