Dutch Oven Chili
There are few dishes as comforting, hearty, and satisfying as a pot of homemade Dutch Oven Chili simmering on the stove. Rich with tender beef, aromatic vegetables, beans, tomatoes, and a carefully balanced blend of spices, this classic chili recipe is perfect for cold evenings, game-day gatherings, family dinners, or meal prep for the week ahead. The Dutch oven is ideal for chili because its heavy construction distributes heat evenly, allowing flavors to develop slowly and deeply over time.
This recipe creates a robust, flavorful chili with a thick texture and a perfect balance of heat, sweetness, and savory richness. While chili recipes vary greatly by region and personal preference, this version combines traditional ingredients with slow simmering techniques to create an unforgettable bowl of comfort food.
Why Use a Dutch Oven?
A Dutch oven is one of the best tools for making chili. Its thick walls retain heat efficiently and allow ingredients to cook evenly without scorching. The heavy lid also helps trap moisture, allowing the flavors to meld beautifully during the long simmering process.
Whether you’re cooking indoors on the stovetop or over a campfire, a Dutch oven provides excellent results and makes preparing large batches easy.
Ingredients
For the Chili
- 2 pounds (900 g) ground beef, preferably 80/20
- 2 tablespoons olive oil
- 1 large yellow onion, diced
- 1 green bell pepper, diced
- 1 red bell pepper, diced
- 4 cloves garlic, minced
- 2 tablespoons tomato paste
Beans and Tomatoes
- 2 cans (15 ounces each) kidney beans, drained and rinsed
- 1 can (15 ounces) black beans, drained and rinsed
- 2 cans (14.5 ounces each) diced tomatoes
- 1 can (28 ounces) crushed tomatoes
Seasonings
- 3 tablespoons chili powder
- 2 teaspoons ground cumin
- 2 teaspoons smoked paprika
- 1 teaspoon dried oregano
- 1 teaspoon onion powder
- 1 teaspoon garlic powder
- ½ teaspoon cayenne pepper (optional)
- 1 teaspoon kosher salt
- ½ teaspoon black pepper
Liquid
- 2 cups beef broth
- 1 tablespoon Worcestershire sauce
Optional Toppings
- Shredded cheddar cheese
- Sour cream
- Chopped green onions
- Fresh cilantro
- Sliced jalapeños
- Tortilla chips
- Diced avocado
Equipment
- Large Dutch oven
- Wooden spoon
- Measuring spoons
- Sharp knife
- Cutting board
Step 1: Prepare the Ingredients
Begin by gathering and preparing all ingredients before cooking.
Dice the onion and bell peppers into small, even pieces. Mince the garlic and drain the beans. Having everything ready makes the cooking process smoother and more enjoyable.
Proper preparation also ensures the vegetables cook evenly and contribute consistent flavor throughout the chili.
Step 2: Brown the Beef
Place the Dutch oven over medium-high heat and add the olive oil.
Once hot, add the ground beef.
Cook for approximately 8 to 10 minutes, breaking the meat apart with a wooden spoon as it browns.
Allow some pieces to develop a slight crust before stirring. These browned bits add rich flavor to the finished chili.
If excessive grease accumulates, carefully drain some of it while leaving a small amount behind for flavor.
Step 3: Add the Vegetables
Add the diced onions and bell peppers directly to the browned beef.
Cook for about 5 to 7 minutes until the vegetables soften.
The onions should become translucent while the peppers begin to release their natural sweetness.
Add the minced garlic and cook for another minute until fragrant.
The aroma at this stage should already be incredibly inviting.
Step 4: Toast the Tomato Paste and Spices
Stir in the tomato paste.
Cook for about 2 minutes, stirring constantly.
This brief cooking period caramelizes the tomato paste slightly and deepens its flavor.
Next, add:
- Chili powder
- Ground cumin
- Smoked paprika
- Oregano
- Onion powder
- Garlic powder
- Cayenne pepper
- Salt
- Black pepper
Stir continuously for about one minute.
Toasting the spices helps release their essential oils and enhances the overall flavor of the chili.
Step 5: Add Tomatoes and Beans
Pour in the diced tomatoes and crushed tomatoes.
Stir thoroughly to combine with the meat and vegetables.
Add the kidney beans and black beans.
Mix everything together until evenly distributed.
The chili should already appear thick and colorful, with a wonderful blend of textures.
Step 6: Add Liquid
Pour in the beef broth and Worcestershire sauce.
Stir well to combine.
The broth provides moisture and richness while Worcestershire sauce adds depth and umami.
Bring the mixture to a gentle boil.
Once boiling, reduce the heat to low.
Step 7: Simmer Slowly
Cover the Dutch oven partially with its lid.
Allow the chili to simmer gently for at least 1½ to 2 hours.
Stir occasionally to prevent sticking and ensure even cooking.
As the chili simmers, the flavors meld together and the liquid gradually reduces, creating a rich, thick consistency.
The long simmer is one of the most important steps in achieving exceptional chili.
While the chili is technically edible much sooner, patience rewards you with significantly deeper flavor.
Step 8: Taste and Adjust
After simmering, taste the chili carefully.
Adjust seasoning if necessary.
Possible adjustments include:
- More salt for enhanced flavor
- Additional chili powder for stronger spice notes
- Extra cayenne for heat
- A small pinch of brown sugar if the tomatoes taste overly acidic
Every batch of chili is slightly different, so this final tasting step helps achieve perfect balance.
Step 9: Achieve the Perfect Consistency
If the chili appears too thin, continue simmering uncovered for 15 to 20 minutes.
If it becomes too thick, add a small amount of beef broth until the desired consistency is reached.
A great chili should be thick enough to hold its shape on a spoon while remaining moist and easy to eat.
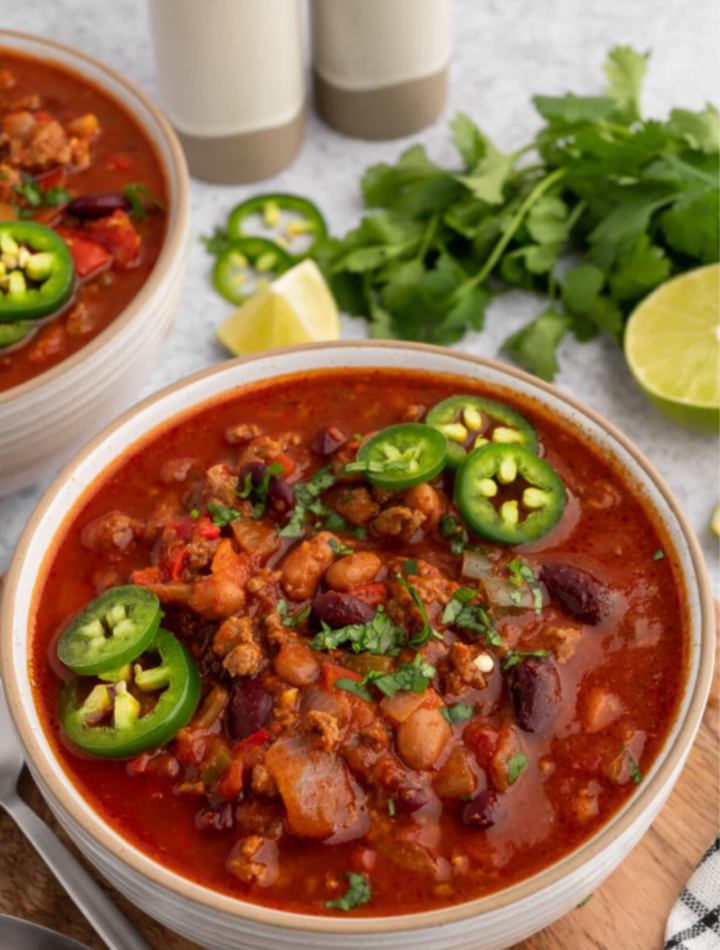
Step 10: Serve
Ladle the hot chili into bowls.
Top with your favorite garnishes such as:
- Shredded cheddar cheese
- Sour cream
- Green onions
- Fresh cilantro
- Jalapeños
- Tortilla chips
- Avocado
Serve with cornbread, crusty bread, crackers, or a simple green salad.
Tips for the Best Dutch Oven Chili
Use Quality Beef
Ground beef with moderate fat content produces the richest flavor.
Don’t Rush the Simmer
The longer the chili simmers, the more complex and balanced the flavors become.
Layer the Seasonings
Adding spices at different stages creates deeper flavor than simply mixing everything together at once.
Stir Occasionally
Regular stirring prevents sticking and helps distribute flavors evenly.
Make It Ahead
Chili often tastes even better the next day after the flavors have had time to develop further.
Variations
Texas-Style Chili
Omit the beans and use chunks of beef chuck instead of ground beef.
Turkey Chili
Substitute ground turkey for a lighter version.
Vegetarian Chili
Replace the beef with additional beans, lentils, mushrooms, and vegetables.
Spicy Chili
Add chopped jalapeños, serrano peppers, or extra cayenne pepper.
Smoky Chili
Include chipotle peppers in adobo sauce for a smoky, spicy kick.
Storage and Reheating
Store leftover chili in an airtight container in the refrigerator for up to 4 days.
For longer storage, freeze portions for up to 3 months.
Reheat gently on the stovetop over medium-low heat or in the microwave until thoroughly heated.
A splash of broth can help restore the desired consistency if needed.
Conclusion
Dutch Oven Chili is the ultimate comfort food—warm, hearty, flavorful, and deeply satisfying. The combination of browned beef, tender beans, tomatoes, vegetables, and aromatic spices creates a meal that is both simple and impressive. Thanks to the Dutch oven’s superior heat retention and slow simmering capabilities, every ingredient has time to contribute its full flavor to the finished dish.
Whether served on a chilly winter evening, at a tailgate party, or as a make-ahead family meal, this Dutch Oven Chili recipe delivers rich flavor and comforting satisfaction in every spoonful. Once you make it, it may become your go-to chili recipe for years to come.