Few dishes capture the spirit of Japanese comfort food quite like Okonomiyaki. Often described as a savory pancake, this beloved street food is crispy on the outside, tender on the inside, and packed with fresh cabbage, flavorful seasonings, and your choice of delicious fillings. The name okonomiyaki comes from the Japanese words “okonomi,” meaning “what you like,” and “yaki,” meaning “grilled” or “cooked.” True to its name, this versatile dish can be customized with seafood, pork, chicken, vegetables, cheese, or even kimchi, making it perfect for families and home cooks alike.
This easy 20-minute version brings authentic flavors to your kitchen using simple ingredients that are easy to find. Finished with sweet and savory okonomiyaki sauce, creamy Japanese mayonnaise, seaweed flakes, and bonito flakes, it’s a restaurant-quality meal that’s surprisingly simple to prepare.
Whether you’re making lunch, dinner, or a fun weekend meal, this homemade okonomiyaki recipe is sure to become a favorite.
Why You’ll Love This Recipe
Ready in just 20 minutes
Crispy edges with a soft, fluffy center
Budget-friendly ingredients
Easy to customize
Great for using leftover vegetables
Packed with authentic Japanese flavor
Perfect for beginners
Family-friendly and fun to make
Ingredients
For the Batter
1 cup all-purpose flour
¾ cup dashi stock (or chicken broth)
2 large eggs
1 teaspoon soy sauce
½ teaspoon salt
½ teaspoon baking powder
For the Filling
3 cups finely shredded green cabbage
2 green onions, thinly sliced
½ cup cooked shrimp (optional)
4 slices cooked bacon, chopped (optional)
½ cup corn kernels
¼ cup pickled ginger, chopped (optional)
For Cooking
2 tablespoons vegetable oil
Toppings
Okonomiyaki sauce
Japanese mayonnaise
Bonito flakes
Aonori (dried seaweed flakes)
Extra green onions
Toasted sesame seeds
Kitchen Equipment
Large mixing bowl
Whisk
Cutting board
Sharp knife
Large non-stick skillet
Spatula
Measuring cups and spoons
Step 1: Prepare the Vegetables
Start by finely shredding the cabbage. Thin slices cook more evenly and create the perfect texture. Slice the green onions and chop any additional ingredients you plan to include, such as cooked shrimp, bacon, corn, or pickled ginger.
Having everything prepared before mixing the batter makes the cooking process quick and stress-free.
Step 2: Make the Batter
In a large mixing bowl, whisk together the flour, baking powder, and salt.
Add the eggs, soy sauce, and dashi stock. Continue whisking until the batter is smooth and free of lumps. It should have a consistency similar to pancake batter—not too thick and not too runny.
Avoid overmixing, as this can make the finished pancake less tender.
Step 3: Fold in the Filling
Add the shredded cabbage to the batter and gently fold until every piece is lightly coated. Stir in the green onions, corn, pickled ginger, shrimp, or bacon if using.
The mixture will look like it contains more cabbage than batter, and that’s exactly what you want. The cabbage softens as it cooks, creating a light yet hearty pancake.
Step 4: Heat the Pan
Place a large non-stick skillet over medium heat and add the vegetable oil.
Allow the oil to heat until it shimmers slightly. Properly heated oil helps create a beautifully golden, crispy exterior while preventing sticking.
Step 5: Cook the Okonomiyaki
Spoon half of the mixture into the skillet and gently shape it into a round pancake about 1 inch thick. Avoid pressing it down too firmly, as this can make it dense.
Cook for 4 to 5 minutes until the underside is golden brown and crisp.
Carefully flip the pancake using a wide spatula. If needed, use a second spatula for extra support. Cook the second side for another 4 to 5 minutes until fully cooked and lightly browned.
Repeat with the remaining batter.
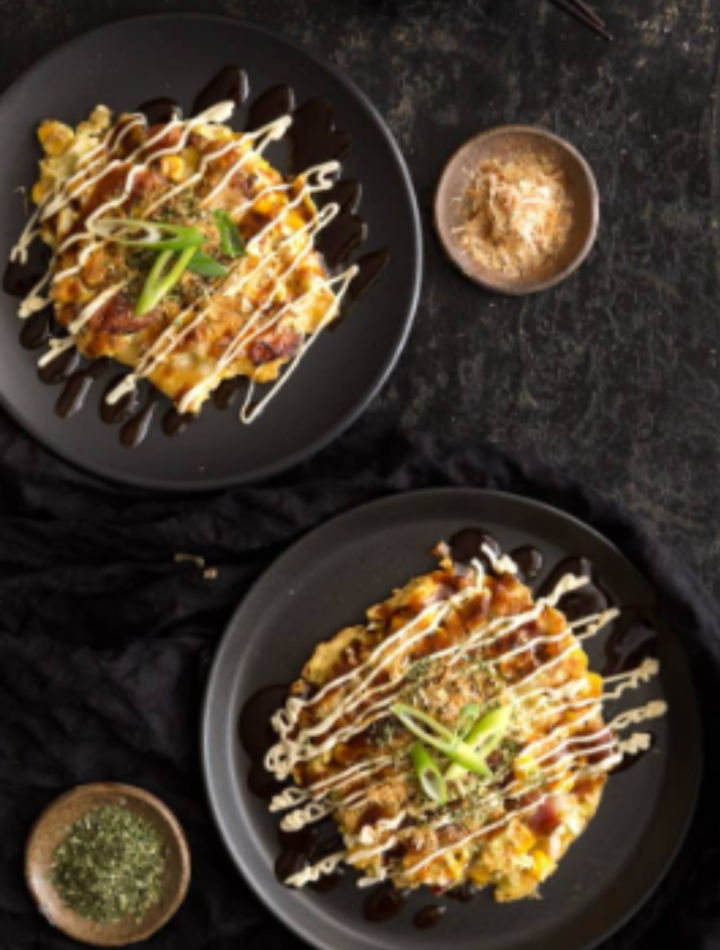
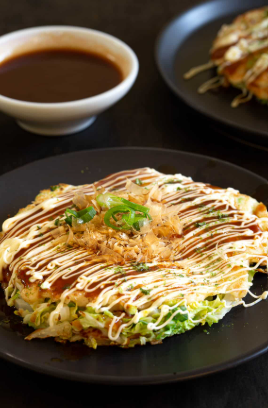
Step 6: Add the Signature Toppings
Transfer the cooked okonomiyaki to a serving plate while still hot.
Drizzle a generous zigzag of okonomiyaki sauce over the top, followed by Japanese mayonnaise in a crisscross pattern. Sprinkle with aonori, bonito flakes, toasted sesame seeds, and extra green onions.
As the pancake’s heat rises, the delicate bonito flakes will appear to dance, creating the classic presentation seen at Japanese street food stalls.
Serve immediately for the best flavor and texture.
What Does Okonomiyaki Taste Like?
Okonomiyaki offers a wonderful combination of flavors and textures. The cabbage becomes sweet and tender as it cooks, while the batter provides a light, savory base. Crispy edges contrast with the fluffy center, and the toppings add layers of richness, sweetness, tanginess, and umami.
The result is satisfying without feeling heavy, making it a comforting dish suitable for any season.
Delicious Filling Ideas
One of the best things about okonomiyaki is its flexibility. Try mixing and matching ingredients to create your own favorite version.
Popular additions include:
Thinly sliced pork belly
Cooked chicken
Crab sticks
Squid
Octopus
Mushrooms
Cheese
Kimchi
Spinach
Bell peppers
Zucchini
Edamame
Tofu for a vegetarian option
Feel free to experiment with combinations based on what you have available.
Tips for Success
Slice the cabbage as finely as possible for a tender texture.
Use medium heat to cook the pancake evenly without burning the outside.
Don’t overload the batter with too many wet ingredients, which can make flipping difficult.
Let the first side become fully golden before turning it over.
A wide spatula makes flipping much easier.
Serve immediately while hot and crispy.
Make It Gluten-Free
To prepare a gluten-free version, substitute the all-purpose flour with a gluten-free flour blend designed for baking. Be sure to use gluten-free soy sauce and verify that your okonomiyaki sauce is also gluten-free.
The texture may vary slightly, but the flavors remain delicious.
Make It Vegetarian
Skip the bacon, shrimp, and bonito flakes, and use vegetable broth instead of dashi if desired. Add mushrooms, tofu, corn, spinach, or extra cabbage for a filling vegetarian meal.
A drizzle of Japanese mayonnaise and a sprinkle of seaweed flakes complete the dish beautifully.
Storage
Store leftover okonomiyaki in an airtight container in the refrigerator for up to 3 days.
Keep the toppings separate if possible, adding them after reheating for the freshest taste.
Reheating
Reheat in a skillet over medium-low heat for a few minutes on each side until warmed through. This helps restore the crispy exterior.
Alternatively, warm it in an air fryer at 350°F (175°C) for 3–5 minutes.
Microwaving is convenient but may soften the crispy edges.
Serving Suggestions
Serve your homemade okonomiyaki with:
Miso soup
Steamed rice
Cucumber salad
Pickled vegetables
Edamame
Kimchi
Green tea
Fresh fruit for dessert
These sides create a balanced and satisfying meal.
Frequently Asked Questions
Can I make the batter ahead of time?
It’s best to prepare the batter just before cooking. However, you can chop the vegetables and prepare the toppings in advance to save time.
What if I don’t have dashi?
Chicken broth or vegetable broth works well as a substitute, though the flavor will be slightly different. Even water can be used in a pinch.
Can I freeze okonomiyaki?
Yes. Let the pancakes cool completely, wrap them individually, and freeze for up to 2 months. Reheat directly from frozen in the oven or air fryer until heated through.
Why is my pancake falling apart?
This usually happens if the cabbage pieces are too large, the pancake is flipped too early, or the batter contains too many wet ingredients. Let the first side cook fully before flipping and keep the pancake compact.
Final Thoughts
Homemade okonomiyaki is proof that simple ingredients can create an incredibly flavorful meal in very little time. With its crisp golden exterior, tender cabbage-filled center, and irresistible combination of savory sauce, creamy mayonnaise, and flavorful toppings, this Japanese street food favorite is both comforting and exciting. Best of all, its customizable nature means you can adapt it to your favorite ingredients or whatever you have on hand.
In just 20 minutes, you can enjoy an authentic-inspired dish that brings the vibrant flavors of Japanese street markets right to your own kitchen. Whether you’re cooking for yourself, your family, or guests, this easy okonomiyaki recipe is guaranteed to impress and will quickly earn a place in your regular meal rotation. Enjoy every delicious bite!