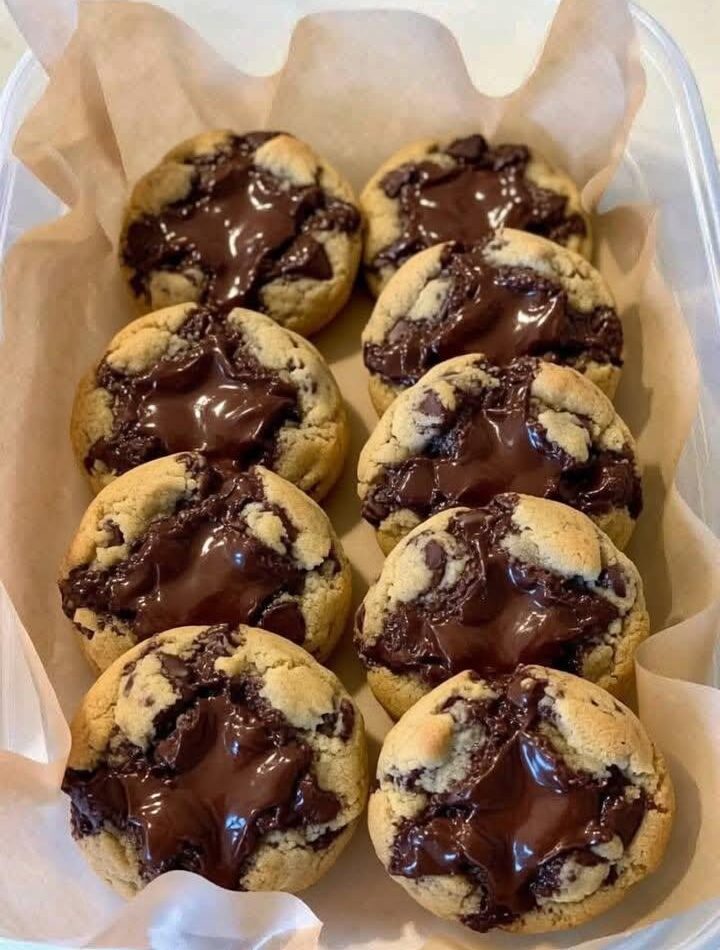
Gooey Chocolate Lava Cookies 🌋🍪There’s something magical about biting into a warm chocolate cookie and discovering a rich, molten chocolate center hidden inside. These Gooey Chocolate Lava Cookies combine everything people love about classic chocolate chip cookies and decadent lava cake in one unforgettable dessert. They’re soft on the outside, gooey in the middle, perfectly buttery, and packed with deep chocolate flavor in every bite.Whether you’re baking for a party, family movie night, holiday tray, or simply satisfying a late-night chocolate craving, these cookies are guaranteed to impress. The crisp golden edges, chewy centers, and flowing chocolate lava filling make them look bakery-worthy while still being easy enough for home bakers of any skill level.The secret to getting that perfect lava center is chilling the dough and using a thick chocolate filling that melts beautifully while baking. Once you master this recipe, you’ll want to make these cookies again and again.
Ingredients 📝For the Cookie Dough:2 1/4 cups all-purpose flour 🌾1 tsp baking soda1/2 tsp salt 🧂1 cup unsalted butter, softened 🧈3/4 cup brown sugar1/2 cup white sugar2 large eggs 🥚🥚2 tsp vanilla extract1 cup semi-sweet chocolate chips 🍫For the Gooey Lava Filling:1 cup chocolate hazelnut spread or melted chocolate ganache 🍫1/2 cup dark chocolate chunksOptional Toppings:Flaky sea saltExtra chocolate chipsPowdered sugarVanilla ice cream 🍨
Instructions 👩🍳Step 1: Prepare the Lava FillingBefore making the cookie dough, prepare the chocolate lava center. Line a small tray or plate with parchment paper. Scoop small spoonfuls of chocolate hazelnut spread or thick ganache onto the tray. You want about 12 small mounds, roughly 1 tablespoon each.Place the tray into the freezer for 20–30 minutes until the chocolate becomes firm. Freezing the filling makes it much easier to wrap inside the cookie dough later and helps create that molten center during baking.If you skip this step, the filling may leak out while shaping the cookies.
Step 2: Mix the Dry IngredientsIn a medium mixing bowl, whisk together the flour, baking soda, and salt. Mixing the dry ingredients separately ensures the baking soda is evenly distributed throughout the dough, which helps the cookies bake evenly.Set the bowl aside while you prepare the wet ingredients.
Step 3: Cream the Butter and SugarsIn a large mixing bowl, beat the softened butter, brown sugar, and white sugar together until light and fluffy. This usually takes about 2–3 minutes with an electric mixer.The brown sugar gives the cookies moisture and chewiness, while the white sugar helps create lightly crisp edges. Creaming the butter and sugar properly also creates air pockets that make the cookies soft and tender.Add the eggs one at a time, mixing well after each addition. Stir in the vanilla extract for extra warmth and flavor.
Step 4: Combine the DoughGradually add the dry ingredients into the wet mixture, stirring until just combined. Be careful not to overmix the dough, as this can make the cookies dense instead of soft and chewy.Fold in the chocolate chips and dark chocolate chunks. The extra chocolate throughout the dough adds layers of texture and richness that pair perfectly with the molten center.At this stage, the dough should be thick, soft, and slightly sticky.
Step 5: Assemble the Lava CookiesScoop about 2 tablespoons of cookie dough and flatten it slightly in your hand. Place one frozen chocolate filling mound in the center.Cover the filling with another small piece of dough and carefully seal the edges completely so the chocolate stays inside while baking.Roll the dough gently into a ball and place it on a parchment-lined baking sheet. Repeat with the remaining dough and filling.Once all cookies are assembled, chill them in the refrigerator for at least 20 minutes. This step helps prevent spreading and keeps the centers extra gooey.
Step 6: Bake the CookiesPreheat your oven to 350°F (175°C).Arrange the cookie dough balls on a lined baking sheet, leaving space between each cookie because they will spread as they bake.Bake for 11–14 minutes, or until the edges are lightly golden but the centers still look slightly soft. The cookies may appear underbaked in the middle, but that’s exactly what creates the lava effect.Do not overbake them. The residual heat from the baking sheet will continue cooking the cookies after they come out of the oven.Let the cookies cool for about 5 minutes before serving. This allows the structure to set slightly while keeping the centers warm and molten.
Tips for Perfect Lava Cookies ✨Use Room Temperature ButterSoftened butter mixes more evenly into the dough and creates the ideal chewy texture. Cold butter won’t cream properly, while melted butter can make the cookies spread too much.Freeze the FillingThis is the most important step for achieving a gooey lava center. Frozen filling stays inside long enough for the cookie exterior to bake first.Don’t OverbakeThe cookies should still look soft in the center when removed from the oven. Overbaking will turn the molten center into regular chocolate filling instead of lava.Chill the DoughCold dough creates thicker cookies with better texture and less spreading.
Delicious Variations 🍪Peanut Butter Lava CookiesReplace the chocolate hazelnut filling with frozen peanut butter cups or creamy peanut butter for a salty-sweet twist.Double Chocolate VersionAdd 1/3 cup cocoa powder to the dough for an ultra-rich chocolate cookie base.Salted Caramel Lava CookiesUse frozen caramel sauce as the center filling and sprinkle flaky sea salt on top after baking.Cookies and Cream Lava CookiesMix crushed chocolate sandwich cookies into the dough and stuff the center with white chocolate spread.
Serving Suggestions 🍨These cookies are best enjoyed warm while the centers are still gooey and flowing. Pair them with:Cold milk 🥛Vanilla ice cream 🍨Hot coffee ☕Fresh strawberries 🍓For an extra indulgent dessert, place a warm cookie in a bowl with ice cream on top and drizzle with melted chocolate sauce.
Storage InstructionsStore leftover cookies in an airtight container at room temperature for up to 4 days.To reheat, microwave a cookie for about 10–15 seconds to bring back the molten center.You can also freeze the unbaked cookie dough balls for up to 2 months. Bake directly from frozen, adding 1–2 extra minutes to the baking time.
Final Thoughts 🌋🍫Gooey Chocolate Lava Cookies are the perfect dessert for serious chocolate lovers. They combine the comfort of homemade cookies with the excitement of a molten lava cake center. Every bite delivers warm melted chocolate surrounded by buttery, chewy cookie dough that practically melts in your mouth.These cookies are rich, impressive, and surprisingly easy to make. Whether you serve them fresh from the oven for guests or keep a batch in the freezer for emergency chocolate cravings, they’re guaranteed to disappear fast.Once you break open that warm center and watch the chocolate lava flow out, you’ll understand why these cookies are impossible to resist
Gooey Chocolate Lava Cookies 🌋🍪