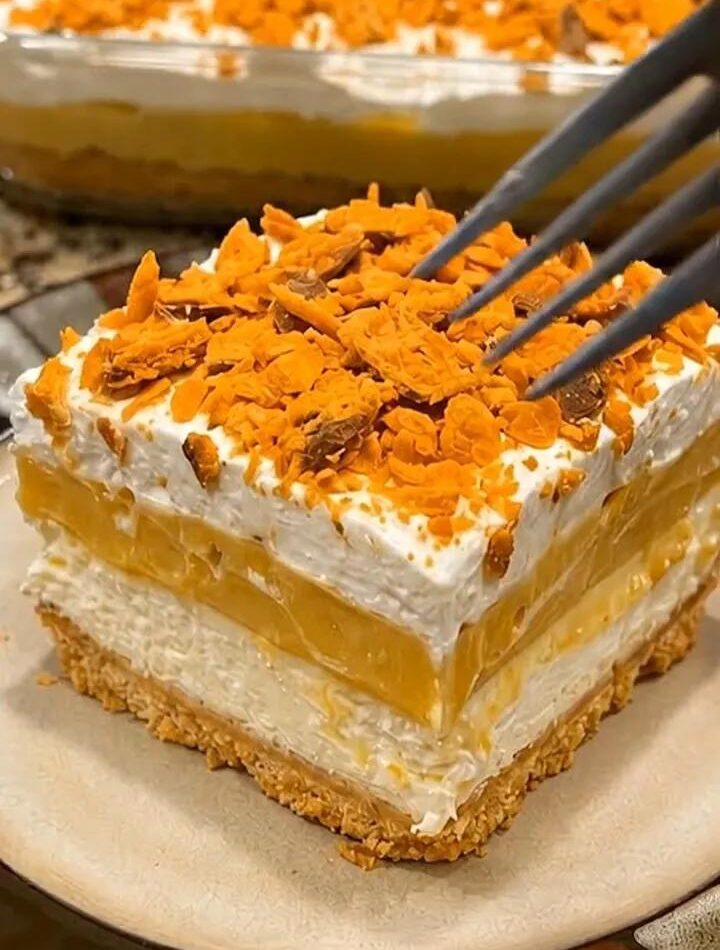
There’s something magical about a chilled layered dessert that combines creamy filling, crunchy candy bars, and a buttery cookie crust. This No-Bake Butterfinger Lush Dessert is one of those crowd-pleasing recipes that disappears almost instantly at potlucks, birthday parties, family dinners, and summer gatherings. It’s rich, creamy, crunchy, sweet, and completely irresistible—yet surprisingly easy to make.
With layers of crushed Golden Oreo cookies, silky cream cheese filling, fluffy pudding, whipped topping, and crunchy Butterfinger candy pieces, every bite delivers the perfect balance of texture and flavor. Best of all, this dessert requires absolutely no baking, making it ideal for warm days when you want something decadent without turning on the oven.
Whether you’re making it for a holiday table, weekend treat, or just because you’re craving something sweet, this dessert is guaranteed to become a favorite.
Why You’ll Love This Dessert
This Butterfinger lush is:
Completely no-bake
Easy to prepare ahead of time
Perfect for feeding a crowd
Rich and creamy with crunchy layers
Great for holidays, parties, and potlucks
Easy to customize with different toppings and candies
The combination of peanut butter, chocolate, vanilla, and buttery cookies creates a dessert that tastes bakery-worthy with minimal effort.
Ingredients
For the Crust
1 family-size package Golden Oreo cookies
1/2 cup (1 stick) unsalted butter, melted
For the Cream Cheese Layer
1 (8 oz) block cream cheese, softened
1 cup powdered sugar
1 teaspoon vanilla extract
1 cup whipped topping or whipped cream
For the Pudding Layer
2 boxes instant vanilla pudding mix
3 cups cold milk
For the Topping
2 cups whipped topping
4–6 Butterfinger candy bars, crushed
Extra cookie crumbs for garnish (optional)
Chocolate syrup drizzle (optional)
Equipment Needed
You don’t need anything fancy for this recipe. Here’s what you’ll need:
9×13-inch baking dish
Food processor or zip-top bag and rolling pin
Mixing bowls
Hand mixer or stand mixer
Rubber spatula
Measuring cups and spoons
Step 1: Prepare the Golden Oreo Crust
The crust is buttery, sweet, and slightly crunchy—the perfect base for the creamy layers above it.
Place the Golden Oreo cookies into a food processor and pulse until fine crumbs form. If you don’t have a food processor, place the cookies in a sealed zip-top bag and crush them using a rolling pin.
Reserve about 1 cup of crumbs for the topping.
Pour the remaining crumbs into a large mixing bowl. Add the melted butter and stir until all the crumbs are evenly coated.
Press the mixture firmly into the bottom of a 9×13-inch dish to create an even crust layer.
Place the dish into the refrigerator while you prepare the filling layers. Chilling helps the crust firm up and hold together better when sliced.
Step 2: Make the Cream Cheese Layer
This layer is smooth, rich, and slightly tangy, balancing the sweetness of the dessert beautifully.
In a large mixing bowl, beat the softened cream cheese until smooth and creamy. This step is important because it prevents lumps.
Add the powdered sugar and vanilla extract. Continue beating until fully combined and fluffy.
Fold in 1 cup of whipped topping gently using a spatula. This gives the layer a light, mousse-like texture.
Spread the cream cheese mixture evenly over the chilled crust.
Use a spatula to smooth the surface carefully so the next layer sits evenly on top.
Return the dish to the refrigerator while preparing the pudding layer.
Step 3: Prepare the Vanilla Pudding
The pudding layer adds a silky texture that makes this dessert extra luscious.
In a medium bowl, whisk together the instant vanilla pudding mix and cold milk for about 2 minutes, until the pudding thickens.
Let it sit for another 3–5 minutes to firm slightly.
Spread the pudding evenly over the cream cheese layer.
Take your time smoothing it gently so the layers stay neat and distinct.
Step 4: Add the Whipped Topping
Spread the remaining whipped topping over the pudding layer in an even layer.
This creates a light and fluffy finish that pairs perfectly with the crunchy Butterfinger topping.
For extra visual appeal, use the back of a spoon or spatula to create soft swirls on top.
Step 5: Add the Butterfinger Crunch
Now comes the best part—the candy topping.
Crush the Butterfinger bars into small chunks. You can chop them with a knife or place them in a zip-top bag and gently crush them.
Sprinkle the crushed Butterfinger pieces generously over the whipped topping.
Add the reserved Golden Oreo crumbs for extra crunch and decoration.
If desired, drizzle chocolate syrup over the top for a bakery-style finish.
Step 6: Chill Before Serving
Cover the dessert and refrigerate for at least 4 hours, though overnight is even better.
Chilling allows the layers to firm up and the flavors to blend together beautifully.
When ready to serve, cut into squares and enjoy cold.
What Makes This Dessert So Good?
The secret to this dessert is the contrast of textures and flavors.
You get:
Crunchy cookie crust
Smooth cheesecake filling
Creamy pudding
Light whipped topping
Crispy Butterfinger candy pieces
Every bite is creamy, crunchy, sweet, and satisfying.
The peanut buttery crunch from the Butterfinger bars works perfectly with the vanilla pudding and buttery Oreo crust.
Tips for the Best Butterfinger Lush
Use Softened Cream Cheese
Cold cream cheese can create lumps. Let it sit at room temperature for about 30 minutes before mixing.
Chill Long Enough
The dessert slices much cleaner after several hours in the fridge.
Crush Candy Just Before Using
Butterfinger bars can lose crunch if added too early. For maximum crispness, sprinkle them on closer to serving time.
Use Instant Pudding
Make sure you use instant pudding mix, not cook-and-serve pudding.
Press the Crust Firmly
A tightly packed crust holds together much better when sliced.
Delicious Variations
Chocolate Butterfinger Lush
Use chocolate pudding instead of vanilla pudding for a richer dessert.
Peanut Butter Lovers Version
Mix 1/2 cup creamy peanut butter into the cream cheese layer.
Frozen Butterfinger Dessert
Freeze the dessert for an ice-cream-cake texture.
Reese’s Version
Swap Butterfinger bars for chopped peanut butter cups.
Caramel Drizzle
Add caramel sauce on top for extra decadence.
How to Store
Store covered in the refrigerator for up to 4 days.
Because it contains dairy and whipped topping, keep it chilled until serving.
You can also freeze the dessert for up to 1 month. Thaw slightly before slicing.
Perfect Occasions for This Dessert
This recipe is ideal for:
Summer cookouts
Birthday parties
Potlucks
Holiday gatherings
Family dinners
Weekend treats
Movie nights
Since it’s served cold, it’s especially refreshing during warmer months.
Serving Ideas
Serve this dessert with:
Hot coffee
Cold milk
Vanilla ice cream
Chocolate drizzle
Fresh strawberries
Extra crushed candy bars
For an elegant presentation, serve squares in dessert glasses topped with whipped cream and candy crumbles.
Final Thoughts
No-Bake Butterfinger Lush Dessert is one of those easy recipes that tastes like you spent hours making it. The creamy layers, crunchy candy pieces, and buttery cookie crust create an unforgettable dessert everyone will ask for again and again.
It’s simple enough for beginners yet impressive enough for celebrations. Since it can be made ahead of time, it’s also incredibly convenient for entertaining.
Once you try this rich, creamy, crunchy dessert, it may become your new favorite no-bake treat. One bite of the fluffy filling and crispy Butterfinger topping, and you’ll understand why this dessert disappears so quickly every single time.