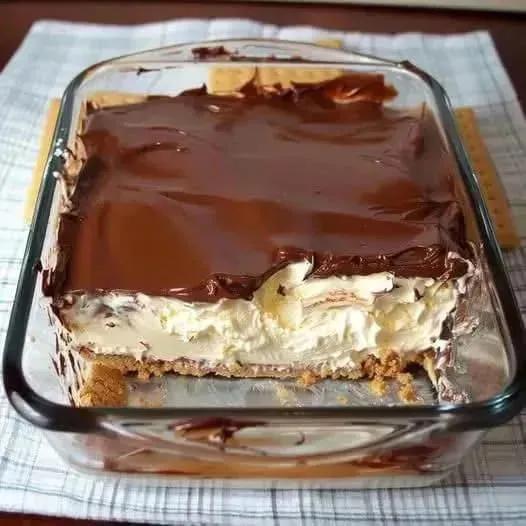
No-Bake Chocolate Banana Dessert 🍫🍌There’s something magical about a dessert that feels luxurious and comforting at the same time, especially when it requires no oven, no complicated baking skills, and only a handful of simple ingredients. This No-Bake Chocolate Banana Dessert is exactly that kind of treat. It combines a buttery biscuit crust, layers of sweet bananas, fluffy cream cheese filling, airy whipped cream, and rich melted chocolate into one irresistible dessert that tastes like it came straight from a bakery display case.Perfect for warm days when you don’t want to turn on the oven, this dessert is creamy, smooth, chocolatey, and packed with banana flavor in every bite. It’s ideal for family gatherings, birthdays, casual dinners, potlucks, or even a late-night sweet craving. The best part is how easy it is to prepare. Even beginner cooks can make this recipe successfully because there’s no baking involved and the steps are simple to follow.The buttery biscuit base gives the dessert a slightly crunchy texture that balances beautifully with the silky filling. Fresh banana slices add natural sweetness and a soft texture, while the cream cheese mixture creates a rich cheesecake-like layer. Melted chocolate drizzled on top ties everything together with deep cocoa flavor that makes this dessert completely unforgettable.Ingredients 🍪🍌🍫For the Crust2 cups crushed biscuits 🍪½ cup melted butter 🧈For the Creamy Filling200 g cream cheese 🧀½ cup powdered sugar1 tsp vanilla2 cups whipped creamFor the Layers2 bananas, sliced 🍌1 cup melted chocolate 🍫Equipment NeededYou do not need fancy kitchen equipment for this recipe. A few basic tools are enough:Mixing bowlsHand mixer or whiskSpatulaMeasuring cups8x8-inch dish or similar serving panSpoon or offset spatulaRefrigeratorStep 1: Prepare the Biscuit CrustStart by crushing your biscuits into fine crumbs. You can use digestive biscuits, graham crackers, vanilla cookies, or any plain sweet biscuit you enjoy. Place them in a food processor for quick crushing, or put them in a zip-top bag and crush them with a rolling pin.Transfer the crumbs into a bowl and pour in the melted butter. Mix until all the crumbs are evenly coated and the texture resembles wet sand. When you squeeze the mixture in your hand, it should hold together easily.Pour the crumb mixture into your serving dish and press it firmly into the bottom using the back of a spoon or the bottom of a glass. Make sure the layer is even and compact because this creates the sturdy foundation of the dessert.Place the crust into the refrigerator for about 15 to 20 minutes so it can firm up while you prepare the filling.Step 2: Make the Cream Cheese FillingIn a large bowl, add the softened cream cheese, powdered sugar, and vanilla extract. Beat the mixture until smooth, creamy, and free of lumps. Softened cream cheese is important because cold cream cheese can become clumpy and difficult to mix.Next, gently fold in the whipped cream. If using store-bought whipped topping, simply fold it into the cream cheese mixture. If using homemade whipped cream, make sure it has stiff peaks before combining.Fold carefully to keep the filling light and fluffy. Overmixing can deflate the whipped cream and make the filling dense instead of airy.The final texture should be smooth, creamy, and spreadable with a rich cheesecake-like consistency.Step 3: Layer the BananasTake the chilled crust from the refrigerator and arrange the banana slices evenly across the surface. Try to cover the entire crust so every slice of dessert gets delicious banana flavor.Choose bananas that are ripe but still firm. Overripe bananas may become mushy and release extra moisture into the dessert. Fresh banana slices provide a naturally sweet taste that pairs beautifully with the chocolate and cream filling.The bananas also create a soft middle layer that contrasts perfectly with the crunchy crust underneath.Step 4: Add the Creamy FillingSpoon the cream cheese filling over the banana layer. Use a spatula to spread it evenly all the way to the edges of the dish.Take your time smoothing the top because this gives the dessert a beautiful finished appearance. The fluffy cream layer should completely cover the bananas underneath.At this stage, the dessert already looks delicious, but the chocolate topping takes it to another level.Step 5: Add the Chocolate LayerMelt the chocolate using either a microwave or double boiler method. If microwaving, heat in short intervals and stir frequently to prevent burning.Allow the melted chocolate to cool slightly before pouring it over the cream layer. If the chocolate is too hot, it may melt the creamy filling underneath.Drizzle or spread the chocolate evenly across the top. You can create decorative swirls using a spoon or knife for a beautiful presentation.The rich chocolate topping adds deep flavor and creates a luxurious finish that makes the dessert look elegant and irresistible.Step 6: Chill Before ServingPlace the dessert into the refrigerator for at least 4 hours, though overnight chilling is even better. This allows the layers to set properly and helps the flavors blend together beautifully.As the dessert chills, the crust becomes firm, the filling thickens, and the chocolate layer sets into a silky topping.Patience is important here because chilling transforms the dessert from soft layers into neat, sliceable squares.Serving Suggestions 🍽️This dessert is delicious served cold straight from the refrigerator. For extra presentation and flavor, you can garnish with:Chocolate shavingsBanana slicesCrushed biscuitsCocoa powderCaramel drizzleChopped nutsFresh whipped creamServe it with coffee, tea, milk, or even vanilla ice cream for an extra indulgent treat.Tips for the Best Dessert ✨Use Good ChocolateSince chocolate is one of the main flavors, choose a good-quality chocolate for the best taste. Dark, milk, or semi-sweet chocolate all work beautifully depending on your preference.Chill ThoroughlyThe longer the dessert chills, the better the texture becomes. Overnight refrigeration gives the cleanest slices and richest flavor.Keep Bananas FreshTo prevent bananas from browning too quickly, lightly brush them with lemon juice before layering.Make It AheadThis dessert is perfect for preparing in advance. You can make it the night before a party or gathering and simply keep it chilled until serving time.Delicious Variations 🍓One of the best things about this recipe is how customizable it is.Peanut Butter VersionAdd a layer of peanut butter between the bananas and cream filling for a chocolate peanut butter banana dessert.Strawberry Chocolate TwistReplace bananas with sliced strawberries for a fruity variation.Nutty CrunchMix chopped hazelnuts, almonds, or walnuts into the crust for extra texture.Mocha FlavorAdd a teaspoon of instant coffee to the melted chocolate for a subtle mocha taste.Final ThoughtsThis No-Bake Chocolate Banana Dessert is proof that you do not need complicated techniques or expensive ingredients to create something truly special. Every spoonful combines creamy cheesecake filling, buttery biscuit crust, fresh banana sweetness, and rich chocolate decadence into a dessert that feels comforting and luxurious all at once.Whether you make it for guests, family, or simply yourself, this dessert is guaranteed to disappear quickly. It’s easy, affordable, refreshing, and incredibly satisfying. Once you try it, it may become one of your favorite no-bake desserts of all time.