Nothing beats the aroma of freshly baked panettone filling your kitchen, especially when it comes together with almost no effort. This blender panettone recipe is perfect for anyone who loves soft, fluffy homemade bread but doesn’t want to spend time kneading. By blending the wet ingredients and allowing the dough to rise naturally, you can create a beautifully light, slightly sweet bread packed with raisins and candied fruit. Whether you’re preparing it for the holidays, a family breakfast, or an afternoon coffee break, this easy recipe delivers bakery-quality results with minimal work.
The secret lies in using the blender to combine the liquid ingredients into a perfectly smooth mixture before incorporating the flour. This method ensures that the yeast is evenly distributed and creates a consistent dough without the need for extensive mixing. Once the dough has risen, the oven does the rest, producing a golden loaf with a delicate crumb and irresistible buttery aroma.
Ingredients
Wet Ingredients
2 large eggs
350 ml warm milk
120 g granulated sugar
1 tablespoon dry yeast
50 ml vegetable oil
1 teaspoon vanilla extract
1 teaspoon orange zest
1 teaspoon lemon zest
Dry Ingredients
700–750 g all-purpose flour
½ teaspoon salt
Mix-ins
150 g raisins
100 g candied fruit
50 g chopped almonds or walnuts (optional)
For Finishing
1 egg beaten with 1 tablespoon milk (egg wash)
Pearl sugar or sliced almonds for decoration
Powdered sugar for dusting (optional)
Instructions
Step 1: Activate the Yeast
Warm the milk until it is just lukewarm, about 37–40°C (98–104°F). It should feel warm to the touch but not hot. Pour the milk into your blender along with the sugar and dry yeast. Let the mixture sit for about 5 minutes so the yeast begins to activate and becomes slightly foamy.
Step 2: Blend the Wet Ingredients
Add the eggs, vegetable oil, vanilla extract, orange zest, and lemon zest to the blender. Blend for about one minute until everything is completely smooth and well combined.
Step 3: Prepare the Dough
In a large mixing bowl, combine 700 grams of flour with the salt. Gradually pour the blended liquid into the flour while stirring with a wooden spoon or sturdy spatula.
Mix until no dry flour remains. The dough should be sticky and soft. If necessary, add a little more flour, one tablespoon at a time, until you have a soft but manageable dough. Avoid adding too much flour because a slightly sticky dough produces a lighter panettone.
Step 4: Add the Fruit
Pat the raisins dry if they have been soaked. Toss the raisins and candied fruit with one tablespoon of flour before folding them into the dough. This helps prevent them from sinking during baking.
If using chopped almonds or walnuts, fold them in at this stage as well.
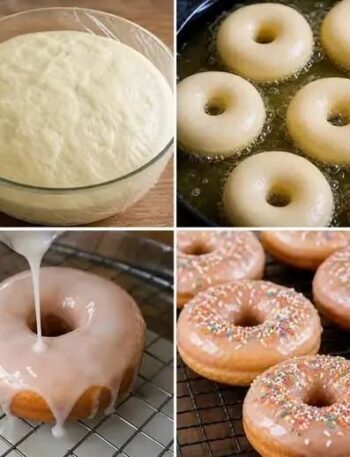
Step 5: First Rise
Cover the bowl with plastic wrap or a clean kitchen towel. Place it in a warm, draft-free area for about 1½ to 2 hours, or until the dough has doubled in size.
The rising time will vary depending on the temperature of your kitchen.
Step 6: Prepare the Pan
Grease a tall panettone mold or a deep cake pan. If using a regular cake pan, line it with parchment paper extending above the rim to support the rising dough.
Transfer the risen dough into the prepared pan, filling it only halfway.
Step 7: Second Rise
Cover the pan loosely and allow the dough to rise again for about 45–60 minutes. The dough should rise close to the top of the mold.
Meanwhile, preheat your oven to 180°C (350°F).
Step 8: Add the Topping
Brush the top gently with the egg wash.
Sprinkle with pearl sugar, sliced almonds, or leave it plain for a classic appearance.
Step 9: Bake
Bake for 40–50 minutes, depending on the size of your pan.
If the top begins browning too quickly, loosely cover it with aluminum foil during the last 15–20 minutes.
The panettone is ready when it is beautifully golden brown and a skewer inserted into the center comes out clean.
Step 10: Cool
Allow the panettone to cool in the pan for about 15 minutes before transferring it to a wire rack.
Cool completely before slicing for the best texture.
Serving Suggestions
This homemade blender panettone is delicious served:
Warm with butter.
Toasted with jam.
Alongside coffee or hot chocolate.
With mascarpone cheese.
Drizzled with honey.
As part of a holiday breakfast.
Used for French toast the next day.
Filled with whipped cream for a festive dessert.
Tips for Success
Always use warm—not hot—milk to protect the yeast.
Measure flour carefully to avoid a dense loaf.
A sticky dough creates a softer texture.
Coat dried fruit lightly with flour before adding.
Allow enough rising time for maximum fluffiness.
Avoid opening the oven during the first 30 minutes of baking.
Cool completely before slicing to preserve the airy crumb.
Storage
Store the cooled panettone in an airtight container or tightly wrapped at room temperature for up to 4 days.
For longer storage, wrap individual slices and freeze for up to 3 months. Thaw at room temperature or warm gently in the microwave or oven before serving.
Variations
You can easily customize this recipe by trying different flavors:
Chocolate chips instead of candied fruit.
Dried cranberries and orange zest.
Pistachios and white chocolate.
Cinnamon with chopped apples.
Hazelnuts and dark chocolate.
Coconut flakes and pineapple.
Mixed dried berries.
Rum-soaked raisins for a traditional flavor.
Final Thoughts
This Panettone en Licuadora proves that you don’t need a stand mixer or hours of kneading to create an impressive homemade sweet bread. The blender does the hard work of combining the ingredients, while the yeast develops a light, airy texture during the rising process. Every slice is tender, buttery, and filled with bursts of sweet raisins and colorful candied fruit, making it perfect for celebrations or simply enjoying with your favorite warm drink.
Whether you’re baking for Christmas, sharing with family, or treating yourself to a homemade bakery-style loaf, this recipe offers consistent, delicious results every time. Once you discover how simple and rewarding this no-knead blender method is, it may become your favorite way to make panettone year after year. Happy baking! 🍞✨