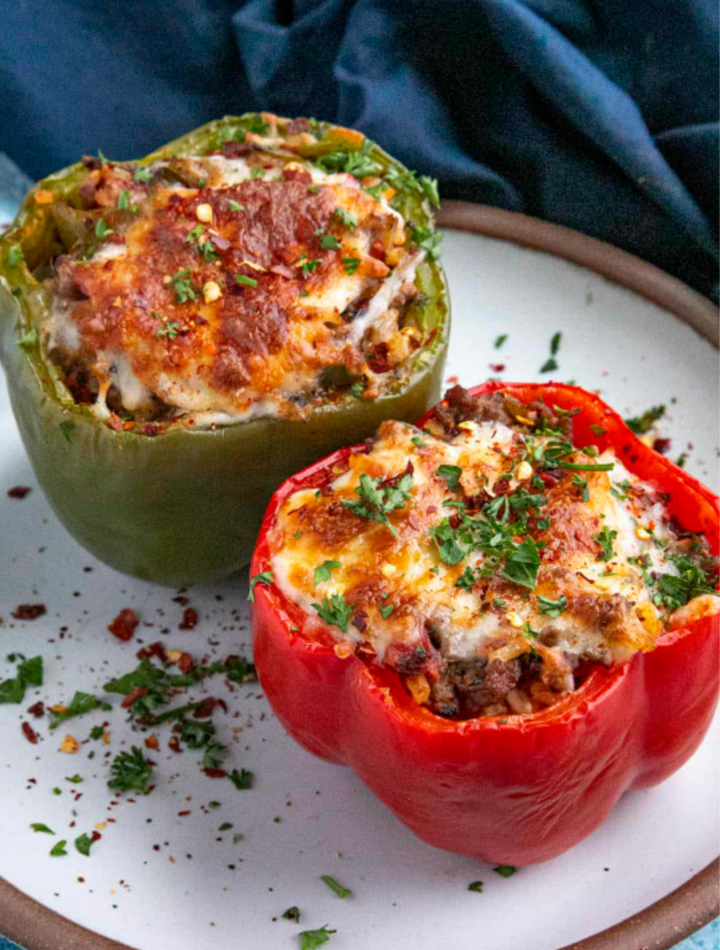
Stuffed Bell Peppers
Stuffed Bell Peppers are a timeless comfort food that combines colorful sweet peppers with a savory filling of seasoned meat, rice, vegetables, and cheese. This hearty dish is nutritious, visually appealing, and versatile enough for both weeknight dinners and special family meals. The peppers become tender as they bake, while the filling absorbs rich flavors from herbs, tomatoes, and melted cheese.
This recipe serves 6 people and produces beautifully stuffed peppers that are juicy, flavorful, and satisfying. The combination of protein, vegetables, and grains makes it a complete meal all on its own.
Why You’ll Love This Recipe
- Easy to prepare with simple ingredients
- Nutritious and well-balanced
- Great for meal prep and leftovers
- Customizable with different fillings
- Colorful presentation
- Family-friendly and satisfying
Ingredients
For the Peppers
- 6 large bell peppers (red, yellow, orange, or green)
- 1 tablespoon olive oil
- ½ teaspoon salt
- ¼ teaspoon black pepper
For the Filling
- 1 pound (450 g) lean ground beef
- 1 tablespoon olive oil
- 1 medium onion, finely diced
- 3 cloves garlic, minced
- 1 cup cooked white or brown rice
- 1 can (14 ounces/400 g) diced tomatoes, drained
- 2 tablespoons tomato paste
- 1 teaspoon dried oregano
- 1 teaspoon dried basil
- ½ teaspoon paprika
- ½ teaspoon black pepper
- 1 teaspoon salt
- 1 cup shredded mozzarella cheese
- ¼ cup grated Parmesan cheese
- 2 tablespoons chopped fresh parsley
For the Sauce
- 1 can (15 ounces/425 g) tomato sauce
- ½ teaspoon garlic powder
- ½ teaspoon onion powder
- ½ teaspoon Italian seasoning
- Salt and pepper to taste
Garnish
- Fresh parsley
- Extra Parmesan cheese
Equipment
- Large baking dish
- Sharp knife
- Mixing bowls
- Large skillet
- Aluminum foil
- Wooden spoon
Step 1: Prepare the Bell Peppers
Preheat your oven to 375°F (190°C).
Wash the bell peppers thoroughly under cold water. Slice off the tops and carefully remove the seeds and white membranes from inside.
If necessary, trim a very thin slice from the bottoms so the peppers stand upright. Be careful not to cut through the base.
Brush the outside of each pepper lightly with olive oil and season with a little salt and pepper.
Place the peppers upright in a baking dish.
Step 2: Pre-Cook the Peppers
Bring a large pot of water to a gentle boil.
Place the peppers into the boiling water and cook for 4 to 5 minutes.
This step helps soften the peppers and ensures they become tender during baking.
Remove the peppers carefully and allow them to drain upside down on paper towels.
Step 3: Cook the Filling
Heat 1 tablespoon olive oil in a large skillet over medium heat.
Add the diced onion and cook for about 4 minutes until softened.
Add the garlic and cook for another minute until fragrant.
Add the ground beef and cook until browned, breaking it apart with a wooden spoon as it cooks.
Continue cooking until no pink remains, about 7 to 8 minutes.
Drain any excess fat if necessary.
Step 4: Add the Seasonings
Stir in:
- Oregano
- Basil
- Paprika
- Salt
- Black pepper
Cook for about one minute to allow the spices to bloom and release their flavors.
The aroma should become rich and inviting.
Step 5: Add Rice and Tomatoes
Add the cooked rice, diced tomatoes, and tomato paste to the skillet.
Stir thoroughly until all ingredients are evenly combined.
Allow the mixture to simmer for 5 minutes so the flavors can blend together.
Taste and adjust seasonings if needed.
The filling should be moist but not overly wet.
Step 6: Add Cheese
Remove the skillet from the heat.
Stir in:
- Half of the mozzarella cheese
- Parmesan cheese
- Fresh parsley
The cheese helps bind the filling while adding richness and flavor.
Mix until evenly incorporated.
Step 7: Prepare the Sauce
In a small bowl, combine:
- Tomato sauce
- Garlic powder
- Onion powder
- Italian seasoning
- Salt and pepper
Stir until smooth.
Pour about half of the sauce into the bottom of the baking dish.
This prevents sticking and adds moisture during baking.
Step 8: Fill the Peppers
Using a spoon, carefully fill each pepper with the meat and rice mixture.
Pack the filling gently but firmly.
Mound the tops slightly for an attractive presentation.
Arrange the filled peppers in the baking dish over the sauce.
Pour the remaining tomato sauce around the peppers.
Avoid pouring too much sauce directly on top, which can wash away the cheese later.
Step 9: Bake the Peppers
Cover the baking dish loosely with aluminum foil.
Bake for 30 minutes.
The peppers should begin to soften while the filling heats through completely.
Step 10: Add More Cheese
Remove the foil.
Sprinkle the remaining mozzarella cheese evenly over the tops of the peppers.
Return the dish to the oven and bake uncovered for another 15 to 20 minutes.
The cheese should melt completely and develop a light golden color.
The peppers should be tender when pierced with a fork.
Step 11: Rest Before Serving
Remove the baking dish from the oven.
Allow the stuffed peppers to rest for 5 to 10 minutes before serving.
This brief resting period helps the filling set and makes the peppers easier to serve.
Serving Suggestions
Stuffed Bell Peppers are filling enough to serve as a complete meal, but they pair wonderfully with:
- Garlic bread
- Caesar salad
- Roasted vegetables
- Mashed potatoes
- Green beans
- Cucumber salad
A sprinkle of fresh parsley and extra Parmesan cheese adds a beautiful finishing touch.
Tips for Success
Choose Large Peppers
Larger peppers are easier to fill and create more generous portions.
Use Different Colors
A mix of red, yellow, orange, and green peppers creates a vibrant presentation.
Cook the Rice Ahead
Leftover rice works perfectly and saves preparation time.
Avoid Overcooking
Bake until tender but not mushy. The peppers should still hold their shape.
Taste the Filling
Season the filling well before stuffing the peppers since the peppers themselves are naturally mild.
Variations
Turkey Stuffed Peppers
Substitute ground turkey for a lighter version.
Italian Stuffed Peppers
Add Italian sausage and extra mozzarella.
Mexican Stuffed Peppers
Use taco seasoning, black beans, corn, and cheddar cheese.
Vegetarian Stuffed Peppers
Replace the meat with:
- Black beans
- Lentils
- Chickpeas
- Mushrooms
Low-Carb Stuffed Peppers
Replace rice with cauliflower rice for a lower-carbohydrate option.
Make-Ahead Instructions
These peppers are excellent for meal preparation.
You can assemble them up to 24 hours in advance.
Simply cover and refrigerate.
When ready to cook, bake as directed, adding about 10 extra minutes to account for the chilled filling.
Storage
Store leftovers in an airtight container in the refrigerator for up to 4 days.
The flavors often improve overnight as the ingredients continue to meld together.
Freezing Instructions
Stuffed peppers freeze very well.
To freeze:
- Cool completely.
- Wrap each pepper individually.
- Place in freezer-safe containers or bags.
- Freeze for up to 3 months.
Thaw overnight in the refrigerator before reheating.
Reheating
Oven Method
Place peppers in a baking dish, cover with foil, and heat at 350°F (175°C) for 20 to 25 minutes.
Microwave Method
Heat individual peppers for 2 to 4 minutes, depending on size and microwave power.
Nutritional Benefits
Bell peppers are rich in:
- Vitamin C
- Vitamin A
- Fiber
- Antioxidants
The beef provides protein and iron, while rice contributes carbohydrates for energy. Together, these ingredients create a balanced and nourishing meal.
Final Thoughts
Stuffed Bell Peppers are a classic recipe that combines wholesome ingredients into a colorful and delicious dish. Tender peppers filled with seasoned meat, rice, tomatoes, herbs, and melted cheese create a meal that is both comforting and nutritious. Whether prepared for a busy weeknight dinner, meal prep for the week, or a family gathering, these stuffed peppers deliver satisfying flavor and beautiful presentation every time. Their versatility allows endless customization, ensuring that this beloved recipe remains a favorite for generations to come.