If you’re looking for a cheesecake that’s rich, creamy, beautifully rustic, and surprisingly easy to make, Basque Burnt Cheesecake is the answer. Unlike traditional cheesecakes that require water baths and perfectly smooth tops, this famous Spanish dessert embraces imperfections. Its deeply caramelized, almost burnt exterior contrasts with a silky, custard-like center that melts in your mouth. Originating from the Basque region of Spain, this cheesecake has become a global sensation thanks to its incredible flavor and effortless preparation.
🕒 Time & Servings
Prep Time: 15 minutes
Bake Time: 50–60 minutes
Chill Time: 4 hours minimum
Total Time: About 5–6 hours
Servings: 8–10 slices
🛒 Ingredients
Main Ingredients
2 lbs (900g) cream cheese, room temperature 🧀
1¼ cups (250g) granulated sugar
5 large eggs, room temperature 🥚
2 cups (480ml) heavy cream 🥛
¼ cup (30g) all-purpose flour, sifted 🌾
1 teaspoon vanilla extract
½ teaspoon salt 🧂
🍰 Why This Cheesecake Is Special
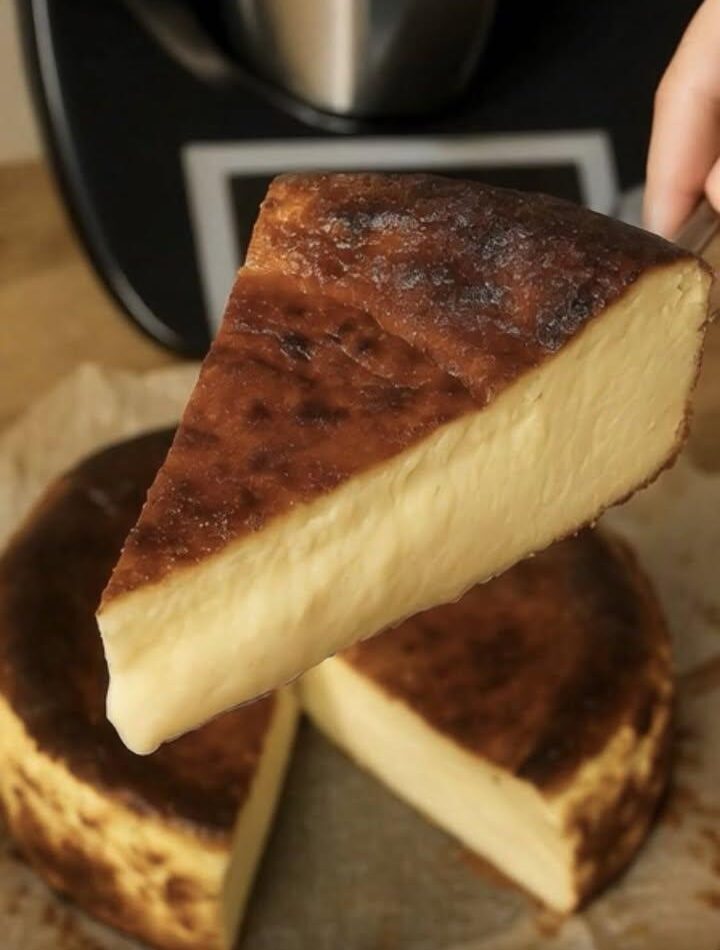
Traditional cheesecakes are baked slowly at low temperatures to avoid browning. Basque Burnt Cheesecake does the exact opposite. It is baked at a very high temperature, creating a dark, caramelized top while keeping the inside incredibly creamy and soft.
The burnt surface develops rich toffee-like flavors, while the interior remains smooth, velvety, and luxurious. The contrast between these textures is what makes this dessert unforgettable.
🔥 Step 1: Prepare Your Pan
Preheat your oven to 425°F (220°C).
Take a 9-inch springform pan and line it with two large sheets of parchment paper. Allow the parchment paper to extend several inches above the rim of the pan. This signature crinkled paper creates the cheesecake’s rustic appearance.
The parchment should fit loosely rather than perfectly. Wrinkles are welcome and actually contribute to the cheesecake’s characteristic look.
🧀 Step 2: Beat the Cream Cheese
Place the softened cream cheese into a large mixing bowl.
Using an electric mixer, beat on medium speed until completely smooth and creamy. This usually takes about 2–3 minutes.
Make sure there are no lumps remaining. Room-temperature cream cheese is essential because cold cream cheese can create lumps that are difficult to remove later.
🍬 Step 3: Add Sugar
Gradually add the granulated sugar while continuing to mix.
Beat until the sugar is fully incorporated and the mixture becomes smooth and slightly fluffy.
Scrape down the sides of the bowl occasionally to ensure everything mixes evenly.
🥚 Step 4: Add the Eggs
Add the eggs one at a time.
Mix well after each addition but avoid overbeating. Overmixing can introduce too much air into the batter, which may cause excessive cracking during baking.
After the final egg is incorporated, the batter should look silky and glossy.
🥛 Step 5: Pour in the Heavy Cream
Slowly pour the heavy cream into the mixture while mixing on low speed.
Add the vanilla extract and salt.
Continue mixing until everything is fully combined and smooth.
The batter will become quite thin compared to traditional cheesecake batter. This is completely normal and contributes to the creamy final texture.
🌾 Step 6: Add the Flour
Sift the flour directly into the batter.
Gently mix until no dry streaks remain.
The flour helps stabilize the cheesecake while still allowing it to maintain its signature custard-like consistency.
Be careful not to overmix at this stage.
🍰 Step 7: Fill the Pan
Pour the batter into the parchment-lined springform pan.
Tap the pan gently on the counter a few times to remove any large air bubbles.
The batter should fill the pan nearly to the top.
🔥 Step 8: Bake
Place the cheesecake in the center rack of the preheated oven.
Bake for 50–60 minutes.
The top should become a deep golden brown to dark brown color. Some areas may appear almost black, and that’s exactly what you want.
The center should still have a noticeable wobble when gently shaken.
Signs it’s done:
✅ Dark caramelized top
✅ Puffing around the edges
✅ Slight jiggle in the center
✅ Rich toasted aroma
Avoid overbaking, as the center will continue setting while cooling.
❄️ Step 9: Cool Completely
Remove the cheesecake from the oven and allow it to cool at room temperature for about 1 hour.
As it cools, the center will naturally sink slightly. This is normal and part of its rustic charm.
Do not remove it from the pan yet.
🕒 Step 10: Chill
Transfer the cooled cheesecake to the refrigerator.
Chill for at least 4 hours, although overnight chilling produces the best texture and flavor.
The waiting period allows the custard-like interior to fully set while developing an even richer taste.
Patience truly pays off here.
🍽️ Serving Suggestions
Remove the cheesecake from the refrigerator about 20–30 minutes before serving.
Slice with a sharp knife dipped in hot water and wiped clean between cuts.
Serve:
Plain for the classic experience
With fresh berries 🍓
With raspberry sauce
With caramel drizzle
With whipped cream
With espresso or coffee ☕
💡 Expert Tips for Success
Use Room Temperature Ingredients
Cold ingredients don’t blend smoothly and can create lumps.
Don’t Fear the Burnt Top
The dark color is intentional and provides the cheesecake’s signature caramelized flavor.
Avoid Overmixing
Too much air can cause excessive cracking and uneven baking.
Chill Overnight
Although four hours works, overnight refrigeration creates the creamiest texture.
Use Full-Fat Ingredients
Low-fat cream cheese or cream won’t produce the same luxurious richness.
🥄 Storage
Store the cheesecake covered in the refrigerator for up to 5 days.
You can also freeze individual slices for up to 2 months. Wrap tightly in plastic wrap and place in an airtight container before freezing.
Thaw overnight in the refrigerator before serving.
✨ Final Result
When sliced, you’ll reveal a stunning contrast between the deeply caramelized exterior and the creamy, custard-like center. Each bite delivers rich cheesecake flavor balanced by subtle notes of caramel and vanilla. The texture is silky, smooth, and incredibly indulgent, making Basque Burnt Cheesecake one of the most impressive desserts you can create with just a handful of simple ingredients.
Enjoy every creamy, caramelized bite! 🔥🍰🧀