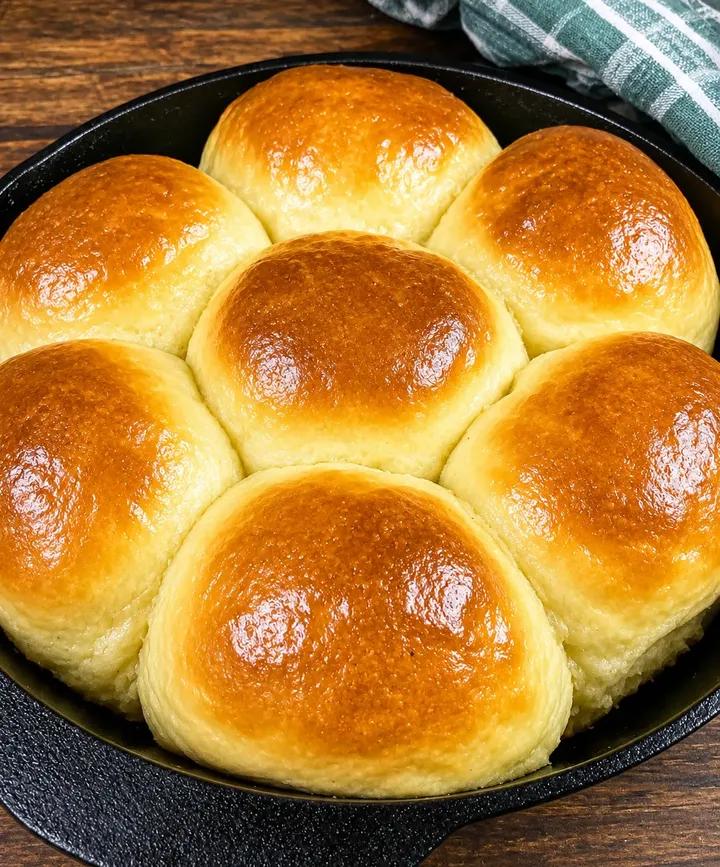
There’s something magical about the smell of freshly baked dinner rolls filling the kitchen. Warm, buttery, and fluffy enough to melt in your mouth, homemade dinner rolls are the kind of comfort food that instantly makes any meal feel special. Whether they’re served beside a holiday roast, a cozy soup, or simply enjoyed warm with butter and honey, these Soft Homemade Dinner Rolls are guaranteed to become a favorite at your table.
Golden on the outside and soft as clouds on the inside, these rolls have the perfect balance of richness and lightness. The dough is easy to work with, rises beautifully, and bakes into tender rolls with a glossy buttery finish. Even if you’re new to bread baking, this recipe will guide you step by step toward bakery-style dinner rolls right from your own oven.
These rolls are perfect for family dinners, holiday feasts, potlucks, or meal prep because they stay soft for days and reheat beautifully. Once you taste them fresh from the oven, brushed with melted butter and still steaming inside, you may never want store-bought rolls again.
📝 Ingredients
For the Dough
4 cups all-purpose flour
1 packet active dry yeast (2 1/4 teaspoons)
1 cup warm milk
1/4 cup granulated sugar
1/4 cup unsalted butter, melted
1 teaspoon salt
2 large eggs
For Brushing
2 tablespoons melted butter
🍞 Why These Dinner Rolls Are So Good
The secret to these rolls is the combination of warm milk, butter, and eggs in the dough. The milk gives the bread richness and softness, while the butter creates a tender crumb. Eggs help the rolls stay fluffy and light while adding beautiful color.
The dough rises twice, which develops flavor and creates that irresistible airy texture. Brushing the tops with melted butter after baking gives the rolls their glossy golden finish and adds even more flavor.
These are the kind of rolls that pull apart in soft layers and practically disappear from the basket before dinner is even served.
⏲️ Preparation Time
Prep Time: 25 minutes
Rise Time: 1 hour 30 minutes
Bake Time: 18–22 minutes
Total Time: About 2 hours 15 minutes
🍶 Step 1: Activate the Yeast
In a large mixing bowl, combine the warm milk and sugar. Stir gently until the sugar dissolves. Sprinkle the active dry yeast over the top and let it sit for about 5–10 minutes.
The yeast should become foamy and bubbly. This means it’s alive and ready to make your dough rise. If nothing happens, the milk may have been too hot or too cold, and you’ll need to start again with fresh yeast.
The ideal milk temperature is warm but not hot — around 110°F (43°C). Too much heat can kill the yeast.
🥚 Step 2: Mix the Dough
Once the yeast mixture is foamy, add the melted butter, eggs, and salt. Whisk until combined.
Gradually add the flour, one cup at a time, mixing continuously. As the dough thickens, switch to using your hands or a dough hook if using a stand mixer.
Mix until a soft dough forms. The dough should feel slightly sticky but manageable. Avoid adding too much flour or the rolls may become dense instead of fluffy.
✋ Step 3: Knead the Dough
Transfer the dough to a lightly floured surface and knead for about 8–10 minutes.
Kneading develops the gluten, which gives the rolls structure and elasticity. As you knead, the dough will become smooth, soft, and stretchy.
If using a stand mixer, knead with the dough hook on medium speed for about 5–6 minutes.
A properly kneaded dough should bounce back gently when pressed with your finger.
🌤️ Step 4: First Rise
Place the dough into a lightly greased bowl and cover it with a clean kitchen towel or plastic wrap.
Set the bowl in a warm, draft-free place and let the dough rise for about 1 hour, or until doubled in size.
During this time, the yeast creates air pockets that make the rolls soft and airy. Watching the dough puff up is one of the most satisfying parts of bread baking.
🍞 Step 5: Shape the Rolls
Once the dough has doubled, punch it down gently to release excess air.
Turn the dough onto a lightly floured surface and divide it into 12–15 equal portions, depending on how large you want your rolls.
Shape each portion into a smooth ball by pulling the edges underneath and pinching them together at the bottom.
Arrange the dough balls in a greased baking dish or sheet pan, leaving a little space between each one.
☁️ Step 6: Second Rise
Cover the shaped rolls loosely with a towel and let them rise again for 30–40 minutes.
This second rise is what creates that beautiful pillowy texture. The rolls will puff up and expand until they’re touching each other slightly.
Meanwhile, preheat your oven to 375°F (190°C).
🔥 Step 7: Bake Until Golden
Bake the rolls for 18–22 minutes, or until the tops are beautifully golden brown.
As they bake, your kitchen will fill with the incredible aroma of fresh bread and butter.
The tops should look shiny and lightly crisp, while the inside remains fluffy and tender.
🧈 Step 8: Brush with Butter
As soon as the rolls come out of the oven, brush the tops generously with melted butter.
This final touch keeps the crust soft and adds rich buttery flavor. The warm rolls absorb the butter beautifully, creating that classic bakery-style finish.
Let the rolls cool for a few minutes before serving warm.
🍯 Serving Ideas
These dinner rolls are incredibly versatile and pair well with almost anything. Here are a few delicious ways to serve them:
With butter and honey for breakfast
Alongside soups and stews
With roasted chicken or turkey dinners
As sandwich buns for sliders
Served with jam or cinnamon butter
Next to holiday meals like Thanksgiving or Christmas dinner
They’re especially delicious fresh from the oven with a little flaky sea salt sprinkled on top.
💡 Tips for Perfect Rolls
Use Fresh Yeast
Always check the expiration date on your yeast. Fresh yeast gives the best rise and texture.
Don’t Over-Flour the Dough
The dough should be soft and slightly tacky. Too much flour can make the rolls heavy.
Give the Dough Enough Time to Rise
Rushing the rise time can lead to dense rolls. A warm environment helps the dough rise properly.
Brush with Butter Twice
For extra flavor, brush the rolls with butter both before and after baking.
Bake Until Just Golden
Overbaking can dry out the rolls. Remove them once the tops are lightly golden.
🧊 Storage Instructions
Store leftover rolls in an airtight container at room temperature for up to 3 days.
To reheat, wrap them in foil and warm in the oven for a few minutes. You can also microwave them briefly for a soft texture.
These rolls also freeze beautifully. Place cooled rolls in a freezer-safe bag and freeze for up to 2 months. Thaw at room temperature and warm before serving.
❤️ Final Thoughts
Soft Homemade Dinner Rolls are one of life’s simplest pleasures. Warm, fluffy, buttery, and made with love, they bring comfort to every table and turn ordinary meals into something memorable.
There’s a special kind of joy in pulling apart a fresh homemade roll and seeing the soft steam rise from the center. Whether you’re baking for a holiday gathering, Sunday dinner, or simply because you’re craving fresh bread, these rolls deliver bakery-quality results every single time.
Once you make them from scratch, you’ll understand why homemade bread has such a timeless charm. One bite of these soft golden rolls, and everyone at the table will be reaching for seconds. 🍞🧈✨
🍞 Soft Homemade Dinner Rolls